Wednesday, December 16, 2015

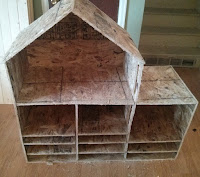
How do you cover a doll house made from OSB?

How do you cover a doll house made from OSB?

When “Spiderman Jr.” selected the present he wanted to make for “Little Fish” for Christmas I had more than one reaction; excitement, happiness, wonderment and a lot of fear.  I was glad he wanted to make her a doll house and I loved that he wanted her to have one I thought she couldn’t help but love. 

However, I was afraid because I have never made anything like what he wanted to make her and I knew what he wanted to make was well outside of our budget.  I couldn’t bear to tell him no, he was so excited.  So I told him thank you for picking what you want to make your sister and sent him off to play while my heart sank inside. 

“Spiderman Jr.” and I tried to use some scrap to start building it after we did some measurements but we didn’t have enough of the same thickness of wood. The wood was not even close enough in thickness that I could reasonably plane the wood to make it even.  After about two weeks I expressed my concern and frustration to my husband. How can we make this work? 

My sweet husband hopped on his computer and started looking up types of wood. He calculated how much wood would be needed with the measurements of the doll house and totaled up the cost.  All of the woods were outside our budget. 

Then he asked if the wood needed to be pretty? I paused and thought about it and said “No” we can paint it.  He then showed me OSB wood. Its sturdy (it's used in sub flooring in real homes), cheap and really ugly.  I recognized this wood, I have used this type of wood before and painting it is hard because it absorbs the paint too well. It takes a lot of paint to make it remotely look good and can feel ruff even when painted.

I was hesitant to go with this wood but then when my husband ran the numbers I decided it was the option we had to take. It would allow us to buy the materials to make the doll house “Spiderman Jr.” wanted to make for his sister and was within our budget.  I figured I would just have to use a lot of paint.

As we were building the doll house I kept thinking about how ruff the surface was to the touch.  I tried to find out if others on-line had found good ways to cover OSB. The best I found was someone adding a lot of texture to it before painting. I didn’t want “Spiderman Jr.” using mud or doing texturing. He still occasionally puts things in his mouth that he shouldn’t.
 

So I keep thinking about it, really worrying about it. Then an idea was brought to my mind.  Years ago I read a number of books on “The Great Depression”. In one of those books I read an interview where a woman talked about how she didn’t have the money for wall paper for her home. Her solution was to make homemade glue and take newspapers and glue them to the wall. Then she painted over the newspapers to make her wall paper. Anytime it needed repairs she just added more newspaper on the wall and painted over it.


I thought why not try it on a scrap piece of OSB. I did and it worked. It took the roughness away from the OSB and we could use one coat of paint instead of many to get the color he wanted to use. After a bit of trial and error with how it is best applied here is what we found worked best for us.
Step#1

Get your newspapers (not shiny if you can) glue (Mod Podge is the glue we used), paint brushes and scissors.

Step#2
I had pictures on my phone of this that I can’t find anywhere:(
We cut the paper to fit the place where we were going to glue it.

Step#3
I had pictures on my phone of this that I can’t find anywhere:(
We brushed the glue evenly across the paper we had cut, making sure to brush glue on all of the paper.

Step#4
I had pictures on my phone of this that I can’t find anywhere:(
We carefully placed the glued paper on the walls and gently pressed and smoothed the paper onto the OSB and the wood grabbed it just fine.

Step#5


We let it dry and then painted it in one coat.  When the paint was dry I ran my hand across the painted paper and while not smooth like glass it was so much better than OSB. “Little Fish” is not going to get splinters from these walls and if she damages it, no big deal it’s easy to repair.


Materials                        Cost
Newspaper- already had          0.00
Scissors- already had            0.00
Mod Podge- already had          0.00
Paints- left over from other projects 0.00
Total Cost
                          0.00  

We only have a couple of steps left for him to finish “Little Fishes” present but I am so proud of how hard he has worked on her gift. Almost three months of effort and work is a lot of work and focus for a little one.

Tuesday, December 15, 2015

Fixing an Ottoman Again

Fixing an Ottoman
Again

It’s the end of the day and you are exhausted physically, mentally, and emotionally. All you really want to do is sit down and put your feet up. Maybe watch something on Netflix, the game, possible crochet a little. It doesn’t really matter what you want to do to unwind you just want to relax and put your burdens down for a little while. 

You are lifting your tired legs up onto your ottoman when you remember that it is sagging in the middle like a cake that has fallen. You have tried fixing it many times and it is broken, again. You are too tired to fix it tonight. Your mind starts to wonder; what is the point of fixing it if it’s just going to get broken again?


The point of fixing it again is that eventually, someday all the times you tell your kids to not jump on it will sink in and they will stop jumping on it.

The point is that you do want to have nice things and trying to take care of the things you have sets an example for your children they can recall when they are on their own.

The point is that it is a lot cheaper to keep fixing it than to buy another one; especially when the same things will just happen to the new ottoman.

So why does this keep happening? Why does that webbing that’s inside of the ottoman keep breaking? It keeps breaking because webbing is not strong enough to hold up to life.

Even if you don’t have children everybody trips, falls, loses their balance sometimes. When you fall sometimes you are lucky enough to land on furniture instead of landing on a hard floor. These kinds of landings can break furniture and better it than a person’s body.

In an ottoman what usually breaks is the webbing; unless you have an antique ottoman. The reason these don’t break is the structural guts are built more soundly; they can take a little bit of a beating and that’s why they survive long enough for people to refinish/reupholster them.

 
Antiques have springs or zig zag wire that 
adds strength because of how the wires
 are anchored to the framework of the furniture.
Can you see the structural difference?

So if you don’t have an antique what options do you have left?  I chose this one.


Step#1
I grabbed a Phillips head screw driver, Flat head screw driver, a pair of pliers and a bowl to hold all the parts I was about to take off otherwise I will lose something.

Step#2
I took off the legs with the Phillips head screw driver and pried up the staples with a flat head or pulled them out with the pliers if needed.

Step#3
See the cross beams that don't add enough support for the cushion to stay up. 
I think this was the builders attempt to prevent the issue I have with our ottoman.
I took a hammer and knocked the cross beams out of way.

Step#4
I measured the inside edges of the ottoman or the interior perimeter of the ottoman.
I then divided that number in half. 
I did this because the bottom pieces the ottoman that the builder had added for strength prevented one whole sheet of OSB from being added.

Step#5
I initially cut a piece of OSB 34” x 34”. Then I cut in the middle/in half so there were now two pieces measuring 35” x 17.5”.
I still had the dilemma of the two pieces of wood that the builder used in two of the corners. Here is how I handled it.
I took one of the pieces of wood I had knocked out with the hammer and traced it on the corresponding corners of OSB with marker. 
 Then cut out the little rectangles.
It fits!

Step#6
I took L braces and screwed them in to the OSB boards while it was outside of the ottoman. I tried doing it while it was inside, yeah, that didn’t work.

I then maneuvered one of the boards into the appropriate place and pushed it in until it moved the cushion inside of the ottoman to the place it was originally located and screwed it into place.
I repeated the same steps for the other board with the other side of the ottoman

Step#7
I took our staple gun and stapled 
the dust cover back in place.

Then I screwed the ottoman feet back on.
I set it right side up.

Materials                       Cost
OSB Board- leftover from another project   0.00
3-4 packs of L braces-           11.31
Staple guns and staples- already had  0.00
Phillips head screw driver-already had  0.00
Flat head screw driver- already had   0.00
Pliers – already had              0.00
Measuring tape- already had           0.00
Marker- already had              0.00
Bowl- from the kitchen             0.00
Hammer- already had             0.00
Jig saw- already had                     0.00
Drill- awesome birthday present from my parents  0.00
Total Cost
                                11.31


Wednesday, December 9, 2015

Chess Board Fix

Chess Board Fix

Once a week “Soccerboy” hangs out with other kids and they play strategy games, usually he picks chess.  He also plays chess at home with his siblings. The chess board travels around the house depending on where he is playing; on the couch, on a rug, dining room table, his bed, or his bedroom floor etc.  One of the times he left it on the floor it got stepped on and was broken. I was pretty surprised because it is a thick piece of wood.  The two pieces of the board got placed in my mending basket to repair.

I didn’t repair it right away because I didn’t want to just glue it back together. I could picture it getting snapped again if it got dropped on the floor.  I set the puzzle of how to repair it, if it was possible to repair it, in the back of my mind.

While doweling together some pieces of wood it occurred to me that I could try to dowel the chess board back together.  Doweling would be far sturdier than just gluing it together. If it didn’t work what did I have to lose, the board was already broken. 

Step#1

I took some painters tape and put it on one side of the split board.

Step#2
I matched up a drill bit to the dowel rod I had, making sure that the bit I used was just barely bigger than the dowel rod.

Step#3

 
I then drilled holes through the painters tape about ½ inch deep. I measured the depth by using a dowel rod that I had marked a line on that was ½ inch. 

Side note: I use swimmers goggles when I do wood work.  I have tried many different types of protective goggles and I always end up with something in my eyes.  Three different times I have had to have my eye lid flipped and a small bit of wood, metal or plastic pulled out of my eyes. It hurts and I hate not being able to see so I suction my goggles to my face and nothing gets in my eyes anymore.

Step#4

I then gently pulled the painters tape off the board and laid the non sticky side against the other side of the board. I took a pencil and marked the holes on the board. 

Step#5
I drilled the holes on the other side of the board. Again making sure that the holes I drilled were about ½ inch deep.

Step #6

I took my dowel rod and measured and cut with a miter saw 4- 1 inch pieces of dowel.

Step#7
 
I put the dowels I had cut in the holes I had drilled in one side of the board and tried to put the two pieces of the board together to see if they fit. They fit together.

Step#8

I took the dowels out and put wood glue along the split and in the holes and on the dowels on the one side and put the dowels back in the holes. I then put glue along the split and in the holes on the other piece of the board.

Step#9
I put the two pieces of the board together with the dowels.

Step#10
I clamped the board together with c clamps and to the table to keep it as flat as I could manage.

Step#11
I then took a paper towel and wiped up the excess glue.

Step#12
The next day I unclamped the board to see if it felt solid. It does feel solidly connected. It’s not a perfect fix but it’s already been used and dropped on the floor. It didn’t pop apart so yeah.

Materials                      Cost

Chess board pieces -Already had         0.00
Wood glue-Already had              0.00
C clamps-Already had                         0.00
Painters tape-Already had                   0.00
Drill bit-Already had                            0.00
Pencil-Already had                              0.00
Swimmers goggles-Already had           0.00
Drill-Already had                                0.00
Miter saw(for cutting the dowels) - already had 0.00
Dowels- left over from another project         0.00

Total Cost


                                0.00