Tuesday, August 31, 2021

Soap dispenser sludge

Why is there always water all over the bathroom counter?! It seems to pool around the soap dispenser into a disgusting sludge. How does something that's supposed to clean things end up so gross? 

This pool of soap sludge around our soap dispenser happens because of how we wash our hands as a family. It's a sticky mess that can be harder to clean if I don't get to it right away and I don't want to discourage my kids from washing their hands. If we washed them like medical professionals scrub their hands this wouldn't happen. 

As a family we have talked about shaking out our hands in the sink before drying. We have talked about wiping down the counter after drying our hands. We have tried leaving a towel right next to the the soap dispenser as a reminder to clean up after washing. We have tried placing a wash cloth under the soap dispenser to catch all of the spilled water but the cloth gets saturated very quickly and doesn't catch all of the water what was spilled from hand washing. We have tried placing a hand towel under the soap dispenser and this worked a little better because it captured all of the water but it still ended up a big sopping mess. 

One day I was washing some dishes and placing them on the drying mat when it occurred to me that those mats are really good at absorbing the water without getting really gross quickly. This thought made me pause and ask myself "Why couldn't those serve the same purpose in the bathroom?"

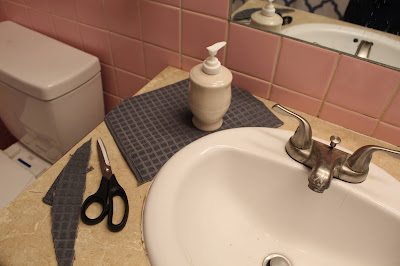
 I bought some extra mats from the dollar tree and placed the whole mat under the soap dispenser and I watched to see what would happen. Sure enough it absorbed all the water and didn't get sticky like the washcloths or towels did. When I changed out the drying mats I could pick up the mat and it wouldn't drip water all over the place. I could easily clean where the mat was when I changed them out.

After living with this for a few months my husband asked if I could cut the mats down so that they were not hanging into the sink or over the edge of the counter. I looked at the edges of the mats and thought I could do the same stitch on my sewing machine. I cut them to fit the shape of the area they were supposed to absorb water and zig zag stitched up the edges. 


We are still working as a family on not dripping all over the bathroom counter but at least we know that everyone is  washing their hands and I am always happy about that.


Saturday, July 31, 2021

Planning school clothes shopping

 School clothes shopping can take a lot of time, emotional energy and money. Over the years I have slowly developed a system that works for our family to cut down on the time it takes, lower the frustration level with finding what we are looking for, and save money.

Step#1

Grab a piece of paper and pencil. Fold the piece of paper in half vertically. I write the name of the child at the top of the paper. On one side of the paper I write NO ALTERATIONS. On the other side of the page I write ALTERATIONS NEEDED.

Step#2

I have each child try on each item of clothing. If it is a shirt I have them lift their arms to see if their stomach shows or if it too short on the arms. If it's shorts or pants I check to see if it is too short on their ankles, or legs. I also check to see if it is too tight on their bottom or waist. If it is now too small in some way and cannot be altered then it goes into my fabric stash for repurposing. If it can be altered to make it still work then I write it down on the ALTERATIONS NEEDED side of the paper and what it needs to make the clothing work again. If the clothes still fit and need no alterations then I write it down on the NO ALERATIONS side of the page. This process of having the kids try on all their clothes does take a large bit of time. However, I have found this is a far better use of time and money because we are not buying clothes that are not needed. At the end of trying on everything we then take the two lists and see what is missing from their wardrobe and make a list of what they are in need of for the next school year.

Step#3

I have the kids hop on Pinterest and pin what they think is cool to wear. Then we look at the pictures together so that I know if it's the color of the shirt, the fabric, the cut of the shirt or shorts etc. This saves so much time and frustration on my part. So many times in the past I thought that I knew based on what they said what they were looking for in their own personal style and I was often wrong. 

Step#4

Take the list of what is needed and the images of what they are looking for and go shopping.

Step#5 

Alterations. I take my list of the clothes that need altered and to that I add clothes that are not quite right at the store that I need to alter. For example, one of my daughters has some sensory issues and so it is very hard to find the clothes in the style she likes and in the right fabrics without paying prices way outside of our budget. The solution is to find clothes as close as we can get and then have her print out a picture of the clothing item from her inspiration board on Pinterest. I pin the picture to the clothing we bought so I know exactly what is desired of the clothing item. This way there is no way to miscommunicate what she wants the clothes to look like and no way to get the fabric wrong because she touched it when she picked it out at the store.


 It does take a lot of time on alterations sometimes but its worth it because she will wear what is in her closet rather the same 3 outfits all year because she cant stand everything else. We are very happy with this process for our kids with sensory needs and our budget, it saves us so much time, energy, and money. This process may not be for everyone but hopefully this can give you ideas for something that will work for your family.

Wednesday, June 30, 2021

Fathers Day Present- Tackle his To-Do List

 Every year I struggle to figure out what to do or buy for my husband for Fathers Day and this year was no different. How do you give a present to someone who already has what he wants unless it's a really expensive item.

 I was mulling this over one day while working through my To-Do list for the day and it occurred to me ," I can take stuff off his To-Do List." If the kids and I can do the stuff that is on his list then that will lighten his load. I knew of things that he had been saying since we moved into our new house that he needed to do. There are always things that weigh on him that he wants to get done but something else more pressing always gets in the way of his getting to that task. I already knew what some of those things were because every time we would pass by that thing he would say something like," Ah, I really need to get that taken care of. I am going to do that this weekend." 

I starting making a list off the top of my head of all the things I have heard him say he needed to get done that he hadn't gotten to because life happens. I know that those things weigh on him emotionally and mentally. Lightening what is weighing him down I thought would be a great gift. I continued to write things down in my bullet journal as I would hear him mention things he wanted to get done. 

Now I just needed an opportunity to get them done without him feeling bad about someone else doing what he had labeled as his responsibility. The opportunity came when his father needed help moving over Fathers Day weekend.

As soon as he left I called the kids together for a family meeting and explained my idea for Fathers Day presents this year. The kids were on board. I broke down his To-Do list into tasks we had to complete each day in order to get it all done while their father was gone. Each day we worked at the tasks on the list till they were done. I was so proud of how hard they worked, they put in 8-10 hours of work most days with me. 

I took before pictures and after pictures in case he didn't notice because he was to tired from moving his Dad. Here are some of the things that were on his To-Do list.

Before-Pruning the hedge

After-Pruning the hedge


Before-Limb hanging over the driveway

After-Limb handing over the driveway


                Before-Moss on stone bench(Its alive!)                                                                         After-Moss on stone bench(Its dyeing!)


                            Before-Weed whack 1 side of the house                                                                       After- Weed whack 1 side of the house


Before- Other side of the house; prune, rake leaves, weed whack 


                                                    After-Other side of the house; prune, rake leaves, weed whack


                                                                        Before-Prettier yard edge; move bushes to fill in gaps and replace dead trees


                                                                                    After-moved bushes to fill in gaps and replaced dead trees


                            Before-Weed by hand blueberry bushes and strawberry plants


                                        After-Weeded by hand the blueberry bushes and strawberry plants


             Before- Trim the bushes in front of the house                                 After-Trimmed the bushes in the front of the house


Friday, April 30, 2021

Family History Comic Book Page


English


Español


 I was working on one of my callings for church.  A calling is like a job that you volunteer your time and service to do. I was wondering if there was some way I could use my talent in art to do my calling better. It occurred to me that maybe drawing what I was trying to say might be a better way to explain what I was talking about. Words are not my strength. This eventually lead me to learning more about comics. I have casually read comics in the past but now I am reading them from a more creative, analytical side of things. I have learned a lot about the ways emotions can be conveyed in certain thought bubbles or speech bubbles. The way movement can be shown through lines. I can tell I still have a lot to learn.

Additionally I have never been good at simple artwork and so I have been trying to work on art that is simpler. Comic drawings seem to be a crazy balance between massive amounts of visual information and yet they do not have all the information a photograph would contain.  Comics seem to have the most important information for the reader to understand what is going on, the emotions behind it, and the situation the character is in.

I have never drawn in this particular style or ever done a comic before, it was quite challenging to try. It certainly isn't a comic book but it's longer than a comic strip. I am not sure if there is some sort of classification for this length. I don't know if I would call this successful but it was really fun to try it. I am gaining more appreciation for the difficulty of what comic artists do with their art.

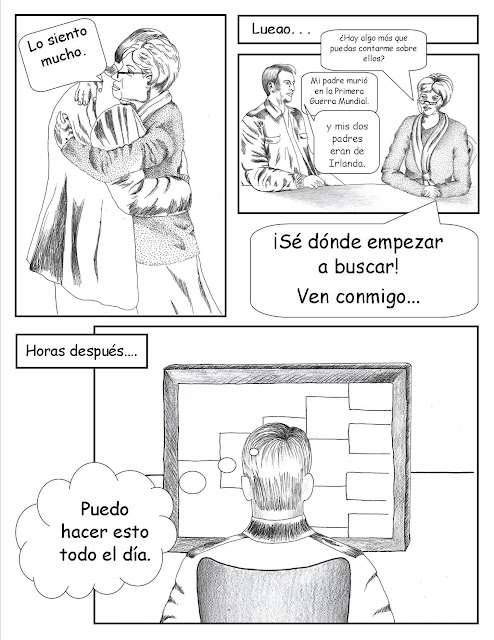
 Here is what I came up with for my first try. I was imagining, "What would be like if Captain America needed help doing his family tree?" 


Wednesday, March 31, 2021

How to mend sweater holes

Matching thread  

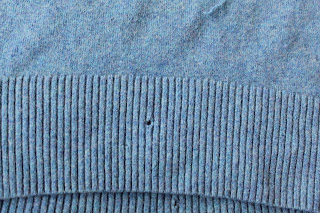
Before


Step 1


Seam rip off the collar. I was gentle and took my time taking off the collar. I didn't want to cause any additional damage to the sweater.

Step 2


Gently pull the thread that the collar was woven from apart. Side note: This was an interesting experience because I have told my children so many times never to pull loose threads because it will make holes or cause damage to fabric. Always cut it carefully. Now I was pulling on threads intentionally to pull the collar apart.

Step 3


Take a needle and some of the thread that was pulled apart and thread your needle. 

Step 4


Place your hand inside of the item you need to mend in the area where the hole is located. Notice outside your hole you will see threads that look like they are on top and thread below those same threads or staggered beneath the threads on top. You will be weaving over and under these threads to create a new patch of fabric where the hole is. For me I measure how big the hole is and start about that same distance away from the hole weaving over and then under, over and then under repeating that pattern until I get to the edge of the hole. Now I will leave a straight line of thread across the hole. On the other side of the hole I will start weaving over then under, over then under until I have gone the same distance away from the hole as I did on the other side.


Turn around and go back the way you came on a parallel line next to the one you just created. Make sure to go under then over. You want to do the opposite of whatever the line you just did for your weaving. For Example: if you just did over then under then do under then over on the way back. Repeat this until you filled in the hole horizontally. At the end you should have a bunch of parallel threads across your hole and along both edges of the hole. It should be a rectangle  that is larger than your  hole.


Step 5


Now going perpendicular to the weaving you just put in your sweater you want to weave over and then under and alternating on the next line under then over in parallel lines again. Except this time your will get to weave over and under your threads that you ran across your hole. Keep repeating this pattern back and forth again until you have closed up the hole. You should now have perpendicular rectangle larger than the original hole you had.

Here is what mine looked like closed.

After


Can you tell that these have been mended, yes if you are up really close. But at the distance that most people stand at before the pandemic it wouldn't matter.

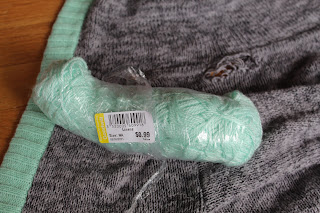
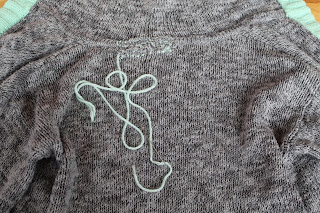
What if you don't have perfectly matching thread you can use from the same clothing item? I had a jacket that had a hole at the neck that had come apart. Side note: I think the tag is what made it wear out there.

Here is an alternative solution when you don't have identical thread to use.

Contrasting thread/yarn

Before


Repeat steps 1-5 as shown above.


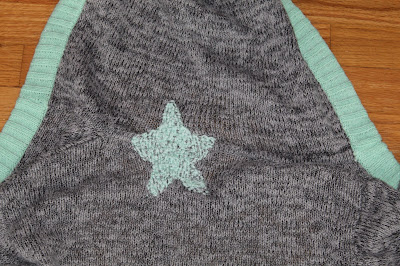
Step 6


Outline a shape that you like with a contrasting color, I chose a star. I also decided to use a yarn that was very close to the mint green the jacket was trimmed with along the edge. Then using the same weaving technique I filled in the shape till I liked how it looked. Side note: Not all mending has to disappear. It can add interest to show that clothing has been mending depending on how you do it. It could just be a mended item or you can make it look more original by embracing the chance that mending brings. It can be fun.

After


Back Story:

Shopping at Thrift stores can be really fun. There is so much variety in the styles of clothes and you can often get nicer quality clothing for far less than buying it new. When I take my teenage daughters we wander around looking at all the clothes, hats, scarves etc. When we have found everything we think we might like we start to narrow things down. We look at how long the clothes might last, are there any holes in them, or are too big or have a stain on them. With thrift store shopping these kinds of problems just arise and we expect them when we look at clothes.

 For our family these kinds of things are not necessarily deal breakers because I can mend and sew. If the clothes have a hole my next question is, Can it be mended closed or patched with out it ripping back open. If the answer is yes, then the item is still under consideration. If the item is too big can I take it in? Some fabrics do not handle seam ripping well and would not handle well what it would take to make the item fit. With other fabrics it's no problem to take things in a little bit or a lot. If its a stain, is this a stain that will come out? If the clothes are a little too bit and I take the item in so that the stain is gone? It is a whole process and is very tiring.

So when I was shopping for "new" clothes with our teenage daughters we found a cashmere sweater one of our daughters loved the color and texture of but there was a collar she didn't like and there were some holes in the front and back. She asked me "Could you take the collar off?" I looked at it and said "Sure." I didn't even mention the holes I noticed because I knew I could use the collar thread to mend the holes in it. I was able to take the collar off and mend the holes in a about an hour. Well worth the 5 dollars we paid for the cashmere sweater she wears at least once a week.