Monday, February 8, 2016

Skylander Curtains Part 1:

Skylander Curtains Part 1:
Winter Curtains-Water Element


Just like when I realized that my garden lacked true function, beauty and a cohesive vision. I had the same realization about our family room. I have been aware that we needed to go further in our attempts for organization.  The controller organizer was working beautifully. However, this area of our family room working so well caused the other areas of dysfunction to come into sharper relief. 

If I were to create a cohesive theme for decorating while organizing our family room, what would it be?  Each person in the family is very different and we have always counted that as a good thing. However, this does pose a problem when you are trying to design a room that is well organized and visually appealing.  I kept thinking about each person in the family and all I kept coming up with was differences in tastes.

I finally found two areas of common ground; area number one-the gospel of Jesus Christ and area number two- gaming. I will put a caveat in area number two, I am not a gamer. I like to play video games but I am very, very picky about the games I am willing to play.  The rest of my family plays games together with me often watching while I do a project in the same room. This is one of the ways we have fun together. They progress the story line , level up characters, and make fun of the villain/s together.

I decided to go with the gaming theme for the family room because it is where we play games. Gospel discussions usually happen in the dining room.  So I went looking on-line for ideas that would create the organization we needed and be beautiful; “From a certain point of view” Obi-Wan Kenobi. If you can have function and fun in the same item then why not?

In the end, I had pinned a ton of images to my Family Room board on Pinterest. My husband and kids then went through all the ideas I had come up with for the family room. I didn’t want to decorate it like just one type of video game, that’s boring for me as an artist. My husband didn’t want the room to have a little bit from every single game the family had ever played. We narrowed it down with some compromises. It would be more than one game inspired but it would stay mostly within Nintendo games. With the exception of some nerdy stuff that is just too cool to leave out, for example some Star Wars and Doctor Who decorations we both wanted to add.

So after analyzing the family rooms dysfunction, the worst area was the consoles. They are all over the kid’s school desk, which is not good for doing homework.  I decided I wanted to make some Donkey Kong shelves for organizing the consoles. However, I also wanted to change the curtains because what I had up currently didn’t remotely match.  There was also the common complaints of a glare on the tv during gaming.  Since I didn’t know how much space the curtains would need and I didn’t want the consoles to overheat if the curtains covered them . I decided the curtains needed to come before the console shelves/organizers.


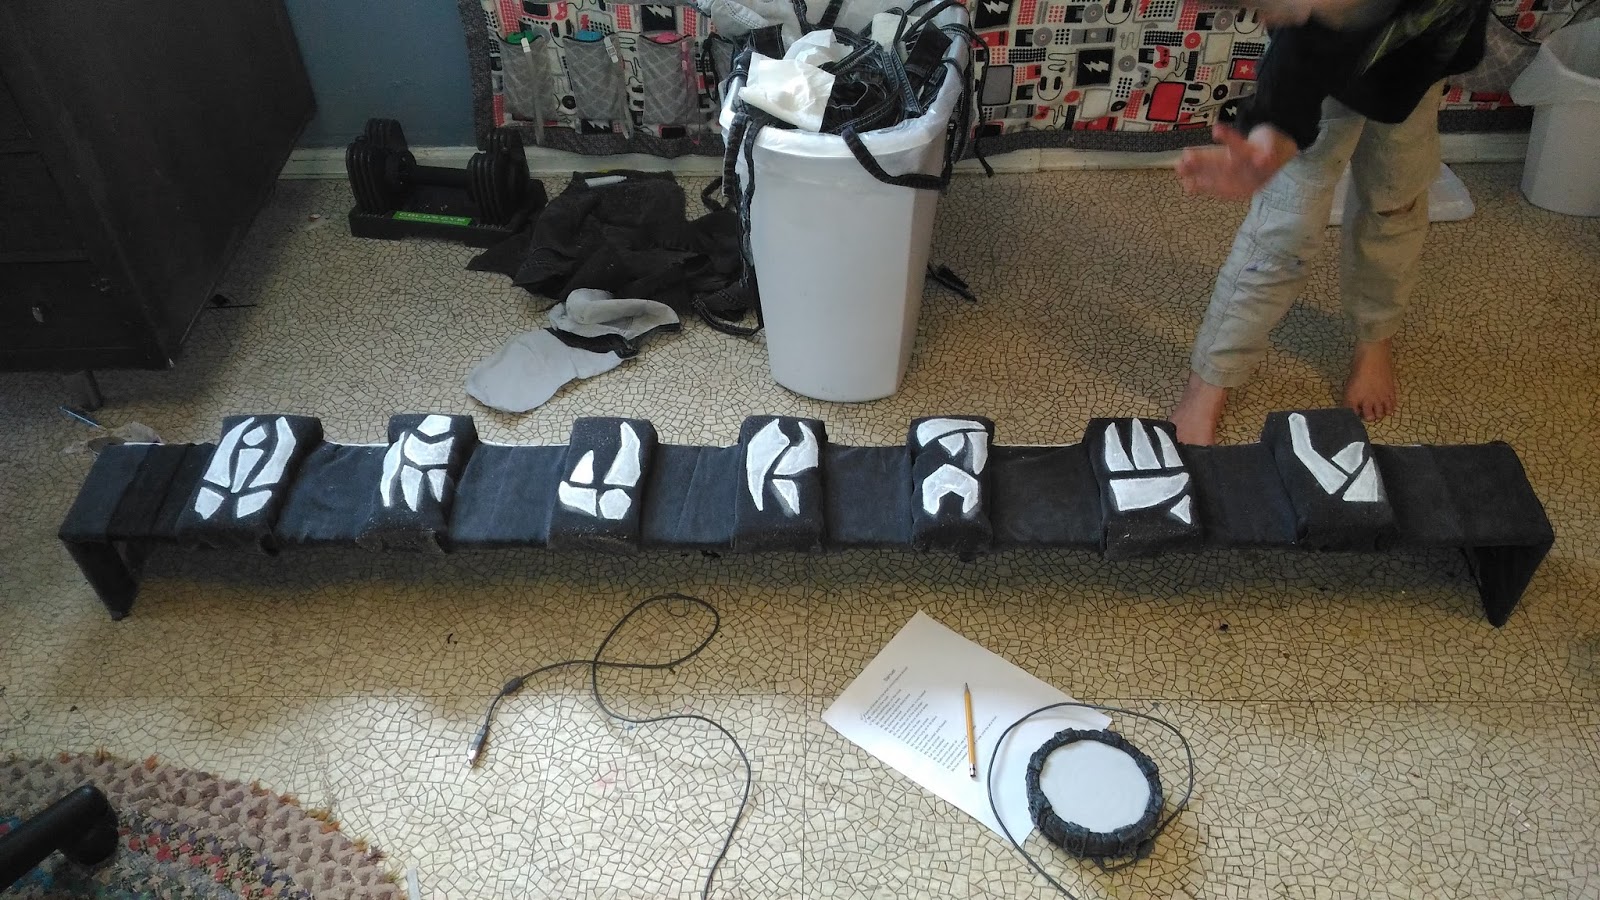
As a result I started thinking about gaming curtain designs. I looked around on-line for ideas and I didn’t find anything I liked. So here is what I came up with for our family room. A valence inspired by the Skylanders portal.  The curtains that hang from the valence will change once a season and will be inspired by an element I feel is a good representation of that season in color.  The water element was what we both thought was a good choice for winter curtains.

 
Before

 
After

If you are interested in seeing how I made the curtains and valence read below.

Step#1
I removed the old curtains and then my husband measured how wide our windows are and added six inches to each side. Then we figured out how much wood we needed to build the valence boxes. We then bought OSB wood because it didn’t have to be pretty wood, just sturdy since it was going to be covered.

Step #2


I gathered materials for building the valence boxes.

Step#3
 

I measured and cut 4 pieces of wood 71” x 6”. 

Then measured and cut 4 pieces of wood 6” x 6”. Then my husband measured and cut 2 pieces of wood 70”x 3”.

Step#4


I screwed the 71”x 6” piece to the 6”x 6” piece on each end.

Step#5


I then screwed the other 71” x 6” piece of wood to the pieces of wood that I had already screwed together. 

Step#6

My husband centered the piece of wood that measured 70”x 3” above the window and screwed it into the wall. Next my husband screwed in 4 L braces on each pieces of wood.

Step#7

I then took the boxes. I measured and marked a line every 
8 ¾” on the front face of the valence boxes.

Step#8


I then cut 14 pieces of foam measuring 4”x 7”.

Step#9
I cut up 4 pairs of worn black jeans.


 Then cut enough of each pant leg to staple the jean down on the sides and staple onto the top and inside of the valence box.

Step#10
I cut smaller strips of fabric from the jeans and then laid it on top of the foam I had covered. Then I stapled as close to where I had stapled on the sides. Then flipped that fabric over and stapled it in place. 


Then I repeated the process and filled in the spaces between the foam pieces.

Step#11

I then took a piece of white fabric and laid it along the edge of the front edge of the valence box behind the foam blocks I had stapled down. I then stapled it down along the front edge. 


I then flipped the stapled white fabric over and tucked the excess under and stapled it down to the inside of the valence box.

Step#12


I then took white chalk and drew the symbols that I saw on the portal onto the pieces of foam. I then painted over the chalk with white acrylic paint.


Step#13


After the paint had dried my husband then lifted the boxes onto the L braces he had previously drilled onto the wood above the windows. He then screwed in the other half of the L braces to the top of the valence boxes. We got the construction idea for the boxes from me redoing my parents valence boxes.


Step#14


I then took a bunch of blue jeans that we had been given and cut them up. I then sorted the jeans from darkest to lightest.


Step#15


I took the pant legs and evened them out so that they were rectangular in nature.


Step#16


I then stitched the jeans together. I started from darkest pair of jeans then moved slowly to the lightest pair of jeans. I always ended with the lightest pair of jeans being on the edge of the curtain that will be in the center of the curtain. 

 Step#17


I then squared the front of the curtains.

Step#18

I then laid the top of the curtain on top of my curtain liner and traced around the edges. I added extra liner fabric at the top to create a way to finish the curtains off. Then cut out the liner.

Step#19


I then stitched the front to the back.


Materials                                                     Cost

Jig saw -already had                                   0.00
Measuring tape-already had                       0.00
Markers-already had                                   0.00
Gloves-already had                                     0.00
Googles-already had                                   0.00
Saw horses- already had                             0.00
Screws- left over from another project         0.00
Drill bit- already had                                     0.00
L braces-                                                      2.00
Pencil- already had                                      0.00
Foam- left over from another project           0.00
Scissors-already had                                   0.00
Staple gun- already had                              0.00
Black jeans- hand me downs                       0.00
Blue jeans- hand me downs                        0.00
Staples- left over from another project         0.00
Chalk- already had                                       0.00
White paint-left over from another project    0.00
Cutting mat- already had                              0.00
Rotary cutter-already had                             0.00
White thread- left over from another project 0.00
Curtain liner- hand me downs                       0.00
Iron- already had                                           0.00
Square- already had                                      0.00
OSB                                                             11.00

                                                             Total Cost

                                                                    13.00


Saturday, January 30, 2016

Monster Journal Inspired by: The Monsters Book of Monsters

Monster Journal 
Inspired by: 
The Monsters Book
of
Monsters

A long time ago it was only the wealthy that could read and write. Anything to do with books was very valuable; paper, ink and the information that was within the pages.  Books were protected and passed down through families.

Journals kept by family members were also valued by their descendants.  Much can be learned from a journal about that person and about what life was like in the world at the time the journal was kept.  Our family has a few journals that were kept by our ancestors and they are wonderful to read.  Reading them has put many things in their proper prospective for me.

As parents we have tried to encourage our children to keep a journal as well.  All of our kids enjoy this to one extent or another, except one. “Spiderman Jr.” draws pictures in his. “Little Fish” draws pictures and writes down things that are important to her. “Future Author” has filled a number of journals. As her nickname suggests she writes not just for historical purposes but for fun. She is unique in our family in her extreme interest in writing.

 As parents we except that our children are all very different from each other and their differences are a good thing. However, there are some things that we encourage our kids to do even if they don’t like doing them and journal keeping is one of them.

Our son “Soccer Boy” could care less about writing in any form. Whether it is for fun or for school he would rather not.  He is also extremely interested in reading. We have a hard time keeping him in new to him books.

One of the series that he loves to read is the Harry Potter series. He will read and reread and reread the Harry Potter series.  Which I think is fabulous because it’s a fantastic series.

So in an attempt to encourage him to keep a journal we decided that I should make him a Monsters book of Monsters as a journal.  I tried to make it as accurate as possible because even though he loves the movies he points out any time the movies do not match the book.  I didn’t want him to get annoyed when looking at his journal since annoyance is the opposite feeling we were trying to create for him.
He does like it:)
I recorded my attempt to create this journal for him in hopes that if anyone else wanted to create a Monsters Book of Monsters maybe this would help them with ideas and help them avoid any mistakes I might make.

Here is the video


Wednesday, January 20, 2016

Wake up kids Music playlist


                                   Waking up the Kids


It’s morning and the alarm is going off and nobody is moving. This is something we have battled as parents for the last two years.  We have tried a number of things to wake them up in the morning. Sometimes we have had to literally pull them out of bed in the morning to get them ready for school.

Like most problems, it was simmering in the back of my head while I was doing other things.  One morning while I was reading my scriptures the thought pops in my head to make a play list of music they like and blare it through the speakers my husband has set up in kitchen and dining room.

I hopped up and got to work finding songs on you tube.  I didn’t have a long list that first morning but watching their reaction when the music started playing was wonderful.  Sleepy heads lifted off pillows and were looking around. The overall expressions were “What is going on?!?!?” It was so wonderful that I started laughing out loud.

That first morning I didn’t tell them it was time to get up. I just blasted their music loudly.  Since then the list has changed length and content.  I change out songs based on their interest level. I know it’s time for a change when they start sleeping through the first few songs. 

Last week I found the Verizon good morning alarm song that I had as my alarm a couple of phones ago. This alarm used to drive them crazy so I changed my alarm because I get up hours before them and I don’t want them getting up that early.  It also used to put them in a foul mood so it was not a good option for waking them up. 

So when I added this song to their play list I waited to see if I was going to get a grouchy “MOMMM” from them. To my surprise they started laughing.  I don’t know how long this will stay on the list but it has been comical for this last week.

We have been doing this for about five months and it has been successful for us. I am not repeating “Time to get up” or “time to get ready for school”. I don’t get frustrated and I get to continue making breakfast or studying my scriptures or whatever I was doing while they get going.  It has been a fun blessing that has not cost us anything.


Total Cost- o.oo

I am not aware of any copy right laws involved in these videos but if I need to take a video off my kids list please let me know and I will remove it.


Monday, January 18, 2016

Stapling a Valence box with Fabric


Curtains! Foiled again!
"Use it up, wear it out, make it do or do without". I love this old timers saying.  It can apply to so many aspects of a person’s life. Curtains are a great example where this saying shines.  Curtains are far more than decoration. They can reduce the amount of hot air coming in your house in the summer and on the other end reduce the cold air coming in during the winter.  This in turn can reduce your utility bill, and that is always nice.  Curtains also provide a level of privacy when drawn. Sheer curtains can also protect your furniture color from being changed by sunlight.  I am sure there are many more practical purposes that curtains serve but these are a few that came to the top of the list for our family.

A person or family can live without curtains in their home.  It will not kill a person to not have them.  So the compromise that is often made when selecting curtains for the place where you live is often based on what is within your budget.  From my perspective this is a completely reasonable part of the decision making process.  As a result of living within your means or making due a person can end up with curtains that serve their purpose but don’t make you happy when you look at them.  Kind of like having oat meal every morning for breakfast. It is good for you and fills your stomach but on its own is nothing special.

My Mom, I will call her “Granny Smith”,
                      
has had some valence boxes that my father built for her years ago; so she could hang curtains from them.  They were well built and were covered with a fabric that was like plain oatmeal for “Granny Smith”. 
                

She did what all smart old timers do, she made due because it was far more important to have curtains up than to spend money they didn’t have for curtains that were more visually appealing.

Years later “Granny Smith” ran across a sale on curtain fabric that she loved which was also in their price range. Now because she had exercised another old timer’s habit, PATIENCE, she was able to have what she wanted without hurting her family financially.

There was only one more problem left. “Granny” SHOULDN’T (yes, Mom that is directed at you) be getting up on ladders and leaning in precarious angles off of ladders anymore.   Those who have watched the show My Little Pony: Friendship is Magic know about Granny Smiths personality; sometimes she tries to do things she should do anymore, she is stubborn and if you don’t get things done fast enough she will do them herself even if she gets herself hurt in the process.  So I was really glad when “Granny” said she would let me change out the fabric on her valences for her as a birthday present. 

                            
It was a fun day of talking about each other’s project while working.  In the end “Granny Smith” had valences boxes covered with fabric she loves and her patience was rewarded.

Before                                               After


Thursday, January 7, 2016

Why 3 Smaller Compost Bins

Why 3 Smaller Compost Bins

Several years ago I built our family one very large compost bin out of old pallets. It took us about a year to really fill it. Within that year I noticed some problems with the design I used.


This is not the one I built. My phone ate that one but it is almost 
exactly the same as what I built. the only difference is that I didn't 
use cinder blocks at the bottom.

Problem #1 Bulging Sides

I did NOT add a cross bar at the top to help add structural strength. It didn’t even occur to me that I would need it. It was a big mistake and here is why. As we filled in more and more compost the sides would bow. If that doesn’t make sense picture a flower opening its petal; very pretty in a flower and it slowly broke the structure of our compost bin.  This led to other problems.

If you are considering building a compost bin I highly recommend you pick a design that has a cross bar in the front so that the frame work is securely in place.  I looked around and not a lot of the designs have this feature.  I also observed these compost bins were early in their use as in the images there was almost no compost in the bins.

Yes, if you add a cross bar it makes it harder to get in there with a shovel to turn it. However, if you are willing to do the work of turning your compost to speed up decomposition than you already know you are in for a lot of hard work.  Why not kept what you built structurally sound?

Problem #2 Side effects of the bulging sides
           / pallet sides

When I constructed the compost bin I used old pallets. I thought this would be good on cost since I could get them for free and the bins could get lots of air flow for help with decomposition.

Yes, there was air flow and it did help break things down. However, I discovered that as the sides bulged out, the pallet openings in between the wood slates left such a wide opening that the compost would fall out of the sides.

Problem#3 Hinged Door

I thought I was being so clever by putting a door on so that I could just have the door swing open.  Here were some problems with my design. I had the door even in height with the side walls of the bin. I did this so that no compost fell out of the bottom. However, as I filled the bin, it got harder and harder to open the door to turn the compost. When the compost got near the top third of the bin the door hinges had been stressed from pressure so much that it was leaning out like the sides were.  The bottom corner of the door had so much pressure on it that the corner had dug into the ground so hard that I could not open the door anymore.

Problem #4 Pallets are too big

In my design I used one whole pallet for each side.  This produces quite a large compost bin.  It was so large that we couldn’t do any of the things to our compost bin that help speed up the process once it was full.  It took two years for what we had put in there at the beginning to break down.

Once the compost was ready we added it into our garden soil before planting time.  We had one of our best crops that year. Our kids loved eating all the things that came out of our garden that year.

Problem#5 Only one compost bin

When I originally built our first compost bin I thought we would use what we composted really quickly so I didn’t really need more than one bin.  It took our family of six about five months to fill this large compost bin.  The problem with this is it took about one year and seven months for the compost to break down. This resulted in all the peelings, yard waste and other things that can be added to a compost bin had to go in the trash because we had no where to put them. What a waste of resources. All that waste because I didn’t have another compost bin to start using in the middle of winter when the other one was full but not ready to use.

When building what I hope will be our last compost bin for a while. I tried to look at all my design flaws from the previous one. I thought about how to prevent or solve those same problems from happening again.  I won’t say what I built is perfect. I may discover some more problems with this design. However, since I couldn’t find an old farmers advice on-line about reliable compost bins this is my next (hopefully last) try at compost bin building.

Unfortunately I don’t have pictures of all the steps. I figured out why I have been loosing pictures and it isn’t my computers fault. It was my phone destroying them while I put them on my computer. My husband decided I needed a new phone instead of using one of my families old phones when they decide to get a new one like I normally do.

Side note: it’s the expense. To have a phone that takes pictures and all the stuff I like costs so much. I start picturing all the things I could buy with that money and decide I can just use someone in the families unwanted phone again, which is probably part of why my phones only last about four or five months.

On topic again. I do have pictures of the features I hope will make for a more sound compost bin and I can explain the reasoning.


Change #1 Cross Bars for Strength


I added cross bars for strength across the top.

 I didn’t have a piece of wood that would stretch the whole length of the bins. So I had the pieces meet in the middle.

Change #2 I used Chicken wire for the sides 
for more strength and less spillage


I stapled every single small wire that came in contact with the wood for more strength to the frame work.


Chicken wire allows for even more air circulations but it has smaller holes so less should spill out. 


Change #3 I created (with my Dads help) wood slates as a “door” 

I created a slot for the pieces of wood to be slide into and out of to close in the compost and my Dad helped me cut slates that would fit in the openings. Yeah for Dads! This door will not get stuck in the ground.


Change #4 3 Smaller Bins

 If the bin gets so full that I can no longer remove the slates or they are just full than I just start using the next bin. And I won’t have to waste resources.


Materials                              Cost
Wood- 
left over from a fence I took out and a fence my Parents took out. 0.00
Screws- Gift card from family for Christmas yeah!            0.00
Chicken wire- extra my parents had                      0.00
Staples- left over from another project                      0.00
Total Cost
                                       0.00


Tuesday, January 5, 2016

What did He See: Garden of Gethsemane


What did He See: Garden of Gethsemane

I spent a long time trying to research what happened to the Saviors body physically based on the descriptions in the scriptures.  I also have a few friends in the medical field who answered many questions for me.  In the end I still didn’t understand much of it.

I was praying one morning for more understanding of the image in my mind, of what He saw, when the thought came “ You really don’t need to understand how, you just need to draw what you saw.”  It was true I would have to study for many, many years to get a very superficial medical understanding of the image in my mind.


Then came the next thought “It is time to start this drawing.” So I am swallowing my fear and starting the next drawing even though I don’t understand why all the colors are the way they are.

These will be separated by days as much as I can manage and if I can find where the photos I took went I will post those alongside the videos of that day.

Day 1


Day 2

Day 3

Day 4

Day 5

Day 6

Day 7


Day 8


Day 9


Day 10


Day 11


Day 12

Day 13


Day 14

Day 15


Day 16


Day 17