Before After
Before After
Its cheaper, you have sentimental attachment to the coat, or you cant find another coat like it.
Step#1
Seam rip the old zipper out. To do this carefully pull on both sides of the fabric around the zipper so that the seams are clearly visible. Now carefully slide the tip of the seam ripper underneath the seam and rock it up and break the thread. Repeat this step until all the thread attaching the zipper to the coat is removed. Then remove the loose threads to clean it up.
I have noticed that on the coats I replaced the zippers on there was not just one seam to remove to take the zipper out, there were three seams. Take special care when removing the seams so that you don't accidentally rip a hole in the coat. You could rip the zipper out in under five minutes but it is not worth ruining the coat to remove the zipper quickly. So please take your time and remove the zipper carefully, you will be glad you did.
Step#2
Take the new zipper and unzip it all the way so that there are two separate pieces. Place the zipper in between the pieces of fabric then pin it in place.
Take note of the extra blank space at the top of the zipper. This extra blank part of the zipper is intended to make it easier to finish off the zipper inside of the coat smoothly rather than leaving a square edge that would easily snag on things like your skin or clothes.
I would also recommend making sure that the bottom edges of the coat lines up evenly so that you are not warping the drape and shape of the coat. Just because the zipper lines up doesn't mean the coat lines up properly. I learned this the hard way and thankfully had not sew the new zipper in yet. In hind site I would have added a pin at the top and bottom where the original zipper was on both sides of the coat so I could get the placement perfect the first time.
Step#3
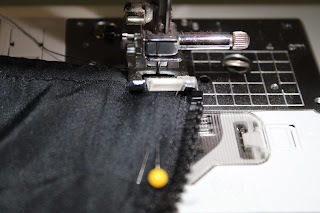
Lower your presser foot and hand crank in your first stitch. Stitch in 4-5 stitches and then back stitch. Sew slowly making sure to put your stitches where they were in the original zipper, as long as there was no damage to the fabric that would prevent it from being secured firmly to the zipper. Be sure to Back-stitch along the bottom as well, that part of the coat will have a lot of tugging and yanking so it will need to be reinforced well.
Do you have to use a zipper foot. My answer is NO, you don't to. I have tried it and it can be done without one if you don't have one but I will say when I tried it I had to go even slower to make sure I didn't break my machine needle.That said, it is a lot easier with a zipper foot so if you have one I would use it. Regardless of whether you use a zipper foot or not take your time and sew slowly through all the layers.
Make sure to use the previous places where the zipper was sewn in, you should see the previous seam lines on the fabric. To get in the right mind set, think "stitch in the ditch" technique.
Also keep in mind you may need more than one seam to secure it like it was previously. For one of the coat zippers I replaced I had to sew in 3 different seams to re-assemble it . Try your best to replicate what the original seamstress did and don't forget those back-stitches.
It took me about 30 minutes to do the whole thing: remove the old zipper, pull out the loose threads and put in the new one. For me replacing the zipper made so much more financial sense then buying a new coat and when it was done I felt good that I could preserve the coats my kids love and still fit for them to wear a little longer.


No comments:
Post a Comment