Wednesday, May 6, 2015

Tablet Mini Backpack

Tablet Pack

I was cycling on a bicycle trainer a little bit ago and I was trying to listen to some music on our stereo.  However, the trainer was too loud once I really started going.  So I switched to headphones and set my tablet down on a surface next to the trainer.  However, if I shifted around at all the head phones would pull out to one degree or another resulting in the music turning off.  I would then have to stop and reconnect the headphones and start peddling again.  A few minutes later I would move in a way that would disconnect my head phones again and I would have to fix things again. I repeated the process for almost forty minutes when I finally gave up on listening to music and just cycled to finish my workout.

This stopping and starting again prevented me from having a good workout and from letting my mind think about what going on in my life, like working out normally does. It was very dissatisfying.  So I tried to think of how I could have music to listen to without having such a disjointed workout.  I have a cycling jersey that has pockets in the back that I could put my tablet into; however my tablet is so sensitive that movement sometimes causes the music to pause as well.  Clearly I needed to shorten the distance that the cord to my headphones had to travel to my ears and a Bluetooth headset was out of our budget.  So how to fix the problem?

Then I thought, how close would it need to be to my ears to not get jostled.  I looked around at what other people had come up with as solutions for when they work out.  However, most people use their phones.  This was not an option for me.  However, if I could create something similar to what I have seen people make for their arms, for my back then maybe I could have the music I wanted.  So here is what I made.

Step #1

 
I found the right materials; focusing on finding something stretchy and that wouldn’t get waterlogged/sweat logged when I work out.  So I decided to use some of my toe socks (I love toe socks) that I had worn holes in and some stretch pants that my daughters have cut up.  I also found my notions. I knew I would need some elastic and Velcro.  So I pulled the elastic from some pj pants I had already cut up to make socks for my son. I then pulled the Velcro from a pair of cleats that were beyond use that I had saved the Velcro from months ago.

Step#2

 
I then traced around the edges of the tablet onto a piece of paper.  I then cut out this piece of paper and set it onto another piece of paper; where I added ¼ inch to each edge for seam allowance. Then cut out the pattern pieces that would be the front and back of the pack. Then I folded the pattern I had just created into a tri-fold like a letter. I traced the folded paper onto another sheet of paper that would be the pattern for the flap of the pack.  I then unfolded the paper and cut out the flap pattern I had created.

Step#3

 
I took my socks and cut off the toes (good bye cute toesL ).

Step #4

 
Then I took off the elastic at the top of the socks.

Step #5

 
Then I turned the socks so the holes in my socks were lined up as closely to a straight line as I could manage. Then I cut a straight line along the holes.  I then opened up the socks and laid them flat.

Step#6

Next I cut off the edges of the socks so that I now had an even rectangular shape.

Step#7

I laid the paper pattern on top of the sock material and pinned it down.

Step#8

I cut the sock material along the edges of the pattern. Then set the material aside.

Step#9

I took the stretch pants my daughters had cut and cut along the seams so that the pants then laid flat.

Step#10

I then pinned the pattern to the pants and cut out 2 pieces, one for the front and one for the back.

Step#11

I then took the elastics from the pj pants and seam ripped out the elastic from them.

Step#12

 
I then seam ripped the Velcro from the old leather flap from the cleat. Then I cleaned out all the old grass that had been caught in the Velcro.  Then I cut the Velcro into small rectangles for use to close the pack.

Step#13

I then stretched out the elastic across my back , starting on my back under my arm pit then going up and over my shoulder  to my collar bone. I then added about half an inch for seam allowance and cut the elastic.  Then I took the elastic I had cut and cut an identical piece for the other arm.

Step#14

I took the elastic and laid it out on a piece of paper and stretched it. Then marked then ends on the paper where it stretched to. Then I flipped the elastic over to the other side so that I would have a front and back measurement for the fabric that would go around the elastic. I did not add seam allowance here because I knew the pants would stretch around it and I wanted the material tight around it. I drew with a ruler the rectangle that I had marked edges for on the paper.  Then I cut of the pattern for the elastic cover.

Step#15

I laid the elastic pattern on top of the pants material and pinned it.

Step#16

I cut the elastic cover material out.

Step#17

I pinned the edges of the elastic cover material.

Step#18

I then stitched the elastic covers along the edge I had pinned.

Step#19

I took a safety pin and flipped them right side out.

Step#20

I then safety pinned the edge of the elastic and pulled the elastic into the inside of the tubes I had created for the elastic covers.

Step#21

I pinned the elastic to the edges of the elastic tubes to keep them in place.

Step#22

I then took the pattern paper for the tablet flap and laid it on the pants material.

Step#23

I pinned the pattern to the material.

Step#24

I cut 2 of the pants material flaps.

Step#25

I took the elastic from the top of my socks and cut them open.

Step#26

I pinned the two edges together.

Step#27


I hand stitched the two edges together. I chose to hand stitch the two edges because my machine tends to get stuck on small thick materials that need to be stitched together.

Step#28

 
I then took the two flap pieces and the elastic from the top of the sock and pinned them together.  I put the elastic inside the two flap pieces.

Step#29

I stitched the three pieces together. Starting along one of the short edges, turn, then along the edge that has the elastic in the middle, turn, then ending with the other short end of the flap.

Step#30

 
I then flipped it right side out.

Step#31

 
I then took the back outside material and laid the elastic down on top of it. Then I laid the flap on top of the elastic and pinned the three layers down. And I also pinned the elastic to the bottom edge.

Step#32

I then stitched along the three layers slowly so I didn’t break the needle in my machine.

Step#33

 
I then laid the back flap down and put the front flap on top of it. So the elastic and flap should be on the inside. Then pinned it along three edges, being sure to NOT pin the edge that has the flap on it.

Step #34

Again starting on the shorter edge I stitched down, turned and stitched along the longer edge, turned, then finished by stitching along the short end.

Step#35

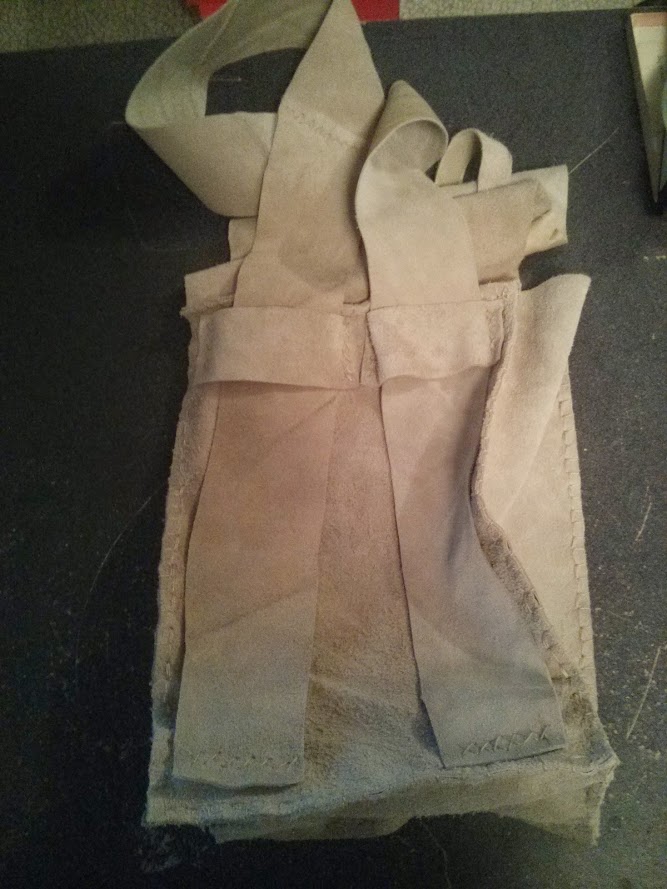
I then flipped it out and it looked like this.

Step#36

I then set the pack aside for a minute and grabbed the sock rectangles.

Step#37

I pinned three edges.

Step#38

I stitched three edges, again starting on the short end, turn, stitch the long end, turn and stitch the other short end.

Step#39

I flipped the pink pack wrong sides out, and then tucked it inside the sock pocket I had sewn. Be sure that the sock pocket is wrong side out. The flap opening should be at the top.

Step#40

I then pinned the two edges together.

Step#41

I stitched along the edge but left a small opening so I could flip it right side out again.

Step#42

I flipped it right side out.

Step#43

I hand stitched the small opening closed with a hidden seam stitch.

Step#44

I then took the Velcro and pinned one side to the inside of the flap and then took the other side of the Velcro and pinned it to the front of the pack.

Step#45

I then stitched it down around the edge then made an x across the Velcro to further anchor it to the fabric.

I then slide it on and tried it out while cycling and it worked great. No cords came loose, or paused from my movement.  I have also used it when going around the house to clean or when I want to listen to a book. I have used it for about two months now and it has held up just fine. When it gets sweaty I just throw it in the wash. If you try to make this and you use a fabric that is not stretchy then I would suggest that you give more seam allowance and you will have to add more size for the height of your tablet. I did not add any size for this because my material was so stretchy and I wanted a tight fit, my end result was snug. I apologize for not having a picture of my tablet in the pack, I take my pictures with my tablet so I don't have one.

Materials                     Cost

Stretch pants-my daughter had cut    0.00
Toe socks- had holes in them         0.00
Elastic- taken from out grown pj’s     0.00
Velcro- taken from old unusable cleats 0.00
Threads- left over from other projects 0.00

Total Cost


                                  0.00

Monday, April 13, 2015

Snow Days

Snow Days


Its 5:30 in the morning, the luminance from the falling snow has woken up the kids and I am wondering how safe the roads are to drive on.  The kids are smashing their faces against the glass or drawing pictures in the frozen condensation on the windows.  I  remember when I was a kid anxiously watching the weather channel to see if my schools name would flash across the TV and I would get a day to play outside in the snow making snowmen, building igloos and lots of snowball fights. I didn’t have to wait very long for each of my kids in turn to ask if school was cancelled. I couldn’t hide my smile, even for kids like mine who like school; a snow day is a treasured jewel.

I went to the computer to look at the news channels to see if their school was delayed or cancelled for the day.  I was less optimistic than my kids about it being cancelled or even delayed. Having looked at more than my kids smashed faces when they were at the window; I could see that our road was bad.  However, our road is usually worse than the main roads, so our road is not usually a good gauge for whether or not school is going to be delayed or cancelled.

As I pulled up the news channels on my computer my kids huddled in around me, those who can read not waiting for me to read it to them. NNOOOO SCHOOOOOL is shouted as they run around celebrating. I quietly laugh as I put on some cartoons for them.

As they watched cartoons I went out to shovel the driveway and sidewalk.  So far the plan my husband had devised was working. The night before we had looked at the weather and lay in bed talking about a potential snow day after the kids were in bed.  So when there was no school I went out to shovel and my husband put the suburban in 4-low and slowly drove to the store. 

Where we live it can snow frequently, however it doesn’t accumulate enough snow to do anything really fun very often.  For example, if you scrape up enough snow for a snowball than you will see ground where the snow was. Which is definitely not enough for a snowman, igloos and snow angels would just get you muddy. It’s lame really, but what can you do about it?

I shoveled our sidewalks, driveway, vehicles and a little into the road but this time I put the snow into a big pile.  When all of the extra snow was gathered I looked at the pile and knew I had enough for the kids and me to make a snowman and have a snowball fight.

In the meantime my husband had gone to the store to get a bag of marshmallows.  He was still not recovered enough to try balancing in snow but he really wanted to be part of the activity. So he got the needed addition to the hot chocolate to go with breakfast.

I got bundled up, making a quiet show of getting dressed warmly. Our youngest daughter asked

“Where are you going?”

“To go make a snowman” I said with a smile and as I was walking out the door.  She was quiet for a second, a look of shock on her face. Our kids had asked many times in the past for us to make a snowman and we had always responded that there was not enough snow for that.  It was always sad for them and us. When she was over her shock she said,

“Can I help?”

“Sure if you are dressed warmly”

She raced around loudly getting her snow gear. I had left the front door open since I knew she would not be long. I am glad I left the door open because I heard her answer her younger brothers’ question

“What are you doing?”

“Going to build a snowman with Mom.”

“I want to build a snowman.”

“You just have to get dressed”


A short time later our older children came out to see what we were doing. They really got into it.  It was a lot of fun for the kids and me.  We were just about done with building the snowman and were starting to throw snowballs at each other when my husband pulled up in the driveway with the marshmallows. It was then time to get in and get warm.  While I made the hot chocolate the kids warmed up some by standing over the heater vents.


Breakfast was really nice, not because it was elaborate but because it was fun; just homemade donuts, hot chocolate and heaping amounts of marshmallow in the hot chocolate.  It was a great snow day.


Smelling Bracelet Attempt #2

Smelling Bracelet Attempt #2


A few seasons ago there was a boy on our oldest sons soccer team who always wore bracelets.  Each practice and game he would show up wearing a new one.  He’d start playing and then end up tossing his bracelet to me because he forgot to take it off. Since I ended up holding his bracelets so often I got to look at a variety of what he said were cool bracelets that everybody wears. Some of these were made out of paracord with a clip as the fastener.

So when I attempted to make another smelling bracelet for my son, thoughts of this boy's bracelets came to mind.  It occurred to me that a clip would be much easier to take on and off our youngest wrists.  So I started doing some research on how to make these bracelets.  I soon learned the reason this boy was able to make so many different bracelets; there are a lot of different braids, knots and weaves that can be used for constructing these bracelets.  I eventually narrowed it down to one style of knot because of how it laid flat (a cobra weave) I thought it would not irritate his wrist.  I did find a good tutorial by: survivalist911 on you tube, called Easy Paracord Bracelet Tutorial  https://youtu.be/UKSGg2IuCLI . There were many other pretty options out there but for my son it being pretty would have been a bad thing.


After I had made the bracelets I then rubbed my body wash along the bracelets and let them dry. Once they had dried I brought them to our son.  He was really excited because he liked the color. They fit him wonderfully but when he put them up to his nose to smell them he said it smelled bad. He really, really didn’t like the smell. I was quite confused at first. I thought for sure that it was my body wash that he liked smelling when he takes my arm to smell. So I took the bracelets off his wrists and I went back to the old drawing board.

Monday, March 16, 2015

Atopic Dermatitis Safe Necklace


Strings and Baubles


The first time I heard the term atopic dermatitis was when my sister was a teenager and I was in my freshman year of college.  I had come home for a break and my sister had just been diagnosed.  For years I had seen my sister break out in these crazy painful looking rashes around her neck, ears, and wrists etc.  Her skin would look cracked and would bleed. Even worse it looked like I could pull chunks of her skin off if I tried. I can only imagine how much it actually hurt.  I am sure it was even more frustrating that she had a diagnosis but it still took a long time to figure out all of the triggers.  She has to be very careful with anything that touches skin, even for what I would consider fleeting moments.  This level of allergic reaction I can now understand on a different level since I have a son with food allergies that could kill him in minutes.  I still don’t think I understand in the same way as the one who has to deal with the allergy.  I won’t ever know what it’s like to not be able to eat something I want or wear something I like because it could kill or disfigure my body.  However, I am aware that this is a struggle for some.

 So what do you do if you have an allergy that is severe? You really have very few options.  You can change so you don’t kill, disfigure, or put yourself in extreme pain all the time.  Or you don’t and you must deal with the consequences.  I wouldn’t really consider that much of a choice. To be blunt, I think it sucks.  There is nothing I can do to make it better. No magic potion to drink or spell like in Harry Potter to get rid of these allergies for my loved ones.  So I make the choice I can make; I adjust how I interact with them.  It’s not discrimination its consideration.

So when I considered my sisters allergies, which I still don’t have completely mastered (YET), I thought about how I really wanted to make her a steam punk inspired necklace last year.  However, a lot of those components are things she is allergic to.  I could try to paint some clear barriers on top of the metal but then I am left wondering; is she going to break out from the coating, what if the coating rubs off, what if I don’t paint it thick enough?  It seemed too great a risk to take with her skin. You know you have given a really lame present when it literally causes them pain. At least when it’s not the: I laughed so hard my face, and stomach hurts and I nearly peed my pants pain, I am ok with that kind of pain.
 

So I started thinking about what components are safe. Plastic seems to be safe and a thread I have that is designed for crocheting dollies.  Crocheted dollies, now that’s a funny picture in connection with that sister.  I apologize, side tangent.  Which lead me to think, where can I find plastic gears??? And things along those lines.  I tried to pull things apart as I thought about it to see what was inside.  I often guessed wrong. I did find some very interesting shapes sometimes on the inside that were plastic but not a lot of plastic gears.


In the end I took the plastic I found and added little bits and bobs to it with the dollie thread.  (Sorry I don’t know the real name of that kind of thread.)  Slowly adding layers of things till it look right to me, which I never fully reached..In the end I knew it was missing one component to make it perfect and I couldn’t figure out what it was.  I was stuck.  So I tried to listen to the Holy Ghost to see if He could prompt me on what I was missing.  The answer I got was frustrating and yet I was still grateful for it.  “You don’t have the part that you can tell is missing. You will not be able to finish it” After that I got that answer I sighed and accepted that it would have to be the best I could do.  And after a few minutes of thought, I smiled; I will have to just keep trying.

Monday, March 9, 2015

A Bag for Book/s

A Bag for Book/s
It was my bother birthday, the one who at times reminds me of “The Swedish Chef” from The Muppets Show.  A whole lot of fun in the kitchen and a little crazy in the best sense.  Last year I made him an apron and I don’t want to pigeon hole him. He is not just a great cook.  So it left me wondering what I can make for him that is really useful.  My mind kept circling around. What is something that I can make that he might actually be able to make his life a better???? I was thinking about the different aspects of his life that I know about and for a while I had nothing.  It was like my mind was saying “uuuuhhhh I don’t know.” with that single phrase on a loop.  

Finally I thought about how much he cares about books, he carries almost everywhere.   It’s not unusual to see him with a book tucked under his arm when he is walking somewhere.  Sometimes at family gatherings (which are not quiet) he is sitting in a chair reading until he decides he wants to engage in conversation.  He is not being anti-social or sticking his nose in the air because he doesn’t want to talk with such underdeveloped minds, no, that’s not it, it’s just a good book.  My brother craves something good to read like pregnant woman crave food.  Both get slightly cranky if they don’t get what they want after a whileJ

When my mind started circling around how much he loves to read. I started thinking about his attitude about the care of book.  I have found in talking to anyone who likes to read a lot there are very different ideas about what shows that a book is well loved.  Some people think it’s a sin to doggy ear a page, others use toilet paper as a book mark (you can guess why that would happen); still others don’t even want the spines to look cracked.  I even know some people who buy two copies of the same book; one in paperback for lots of reading and one hardback to sit on the shelf and look pretty as they slowly complete their collection.  I am sure most people who love to read have their quirks.

One trait that I think most people have in common is that they would cry in alarm if their book got wet.  The letters might run, the pages might stick, or if you tried to still read the pages might fall to shreds.  Then there is the worst nightmare of all, I am not done with the story, aaaaahhhhh!!!(I will include what I do when this happens to me at the bottom)

So I was picturing my brother walking around with his book tucked under his arm and it started to rain.  Now if it was a paperback book this might be mostly protected under his arm.  However, if this was a book that he was waiting a long time for then he might buy it in hardback because he was not going to wait any longer to find out what happen.  Hardbacks do not conveniently fit under the shelter of your arm.  I started to picture this bothering my brother and there was the problem maybe I could solve.
When designing I tried to think about the material, design, and size above all.

Material-To really help in wet weather the “book” bag would need to be as waterproof as I could make it.  All my initial thoughts on fabrics were plastic or vinyl and those fabric are way to girly for this brother.  I didn’t want him to have to decide between protecting his book and looking like a man with a purse.  So I decided on leather.  However I placed the most water resistant side right around the book, so that it would have to really saturate his bag before it got to his book
.


   Design-It would need to be simple with clean lines as I think he only likes crazy in the button up shirts he wears and his cooking.  Again, I didn’t want it to feel like a purse by having a lot of fancy embellishments.  Although I did allow myself the luxury of using a book binding stitch to sew it together with as a nod to his interest in books
.

Size-Lastly it would need to not be too large, if it was too large or a pain to carry around then he definitely would not use it.   So took what I think is his favorite book series and used that as a template for scale. I made it just large enough to hold one of these books.  I also made the straps so that it could hang on a hook when not in use so it would not be on the ground but could adjust to go around his shoulders like a back pack if he chose.


In the end I am not sure if it solved the problem that I was envisioning, if it really works for him.  I hope so, if not “back to the old drawing board” Wylie Coyote Super Genius


When I book I am reading gets wet I carefully put a pieces of wax paper in between each sheet of paper until all of the wet sections air dries.  Next I pull out all the wax paper. Then I take a sheet of paper and place it on top of the wrinkled paper. Starting at the farthest in the story and I gently iron on a low setting the first page gently pressing and flattening out the paper as much as possible.  I repeat this until all the pages that have had water damage have been ironed. Then I place a very heavy book or a lot of heavy book on top of the whole closed book.  I leave the book like this for at least three days.  The book is more flat than it was when it was after it first dried out.  However it is not the same as a non water damaged book but the book can reasonably be read now.

"Born to Burn!" Eruptor Hat

"Born to Burn!" Eruptor Hat
My oldest son loves the Skylanders game. He loves the characters, story-lines, and villain, the evvviiilll Kaos.  My husband and I even like watching him play since it’s really comical.  However, there is for right now not a lot of gear for kids who like the game.  I am sure this is only a matter of time but the makers of the game have a serious problem doing this when you have sooo many character options(which is great for game play).  On top of that I am sure it would be hard to figure out which characters to pick to merchandise.  If you pick one character and not another, what happens to the kid who liked the one that was not picked? They get left out.  It’s a challenge I am sure.

So when my sons’ birthday was coming up I asked him what he wanted and he said” Can you make me an Eruptor hat?” My response was we’ll see” So after he was out of the room I started doing what I always do, research.  At the time there was no visual information for me to use, not on Etsy, Ebay, Amazon that I could find.  Now I am not blaming these companies, if the product isn’t there it’s not there.  
So I looked for good pictures of the character.  There were quite a few to look at which was great!  I then tried to dissect Eruptor, I thought if I were to create him in layers what would be the lowest level and how would I build him up from there.  It was a really challenging project.  I would crochet something and it wouldn’t look right so I would redo it, and redo it, and redo it. The artists who drew Eruptor did a great job with all the detail they put into him.  I kept wanting to be able to paint him to get the blending right. However that level of blending is hard to crochet. In the end I am not sure if I am completely happy with the results.  However, he likes it and that is really what matters.


Wednesday, February 25, 2015

The Genius of the Granny Squares

The Genius of the Granny Square

While in a doctor’s office waiting room I was sitting, crocheting and thinking.  I have been working on this afghan for over a year, grabbing a few minutes here and a few minutes there.  When an “elderly” lady sitting in a chair across the lobby from me asks “Is that a Granny Square?”  I answered “Yes, I have been working on it for a while. Usually when I am waiting for something or someone.”   She then proceeds to tell me about how her mother used to crochet.  “She would take the scraps that are left over and she would make a blanket.  You know it’s not really a Granny Square if it’s not made from scraps.”  This comment made me smile since I was able to reply that “It is made from scraps.”
   
Now I don’t know if that is a true statement, that to be a true granny square it needs to be made from scraps.  A Granny Squares is the first thing I was taught by a friend in high school.  I just always assumed it was the name of the stitch.  I have been thinking about this ladies comment “You know it’s not really a granny square if it’s not made from scraps.”  Maybe the name of this square has more meaning behind it than the name of a pattern.  It could also be talking about an “old timers habit” of using what you had, not wasting, just being clever.  The first thought that comes to my mind when I look at Afghans that my Grandmother made is not, “that sure is a lot of scraps”.  No, my first thought is how beautiful it is, then I start analyzing the color combinations, contrasts in colors, all the movement the piece of art that is an afghan demands I do.

In thinking back on those same Afghans, knowing they are made of scraps, I thought for a second, does it make them less beautiful? My answer is no.  My grandma had to be more creative with her placement. To me that makes her more skillful because she had to use scarce resources to make what she needed.  She still managed to make it look beautiful and functional.  That’s a devious mastermind is what I think.


In making my daughters afghan I was trying to follow this same example.  Using what I had to make what was needed and trying to make it beautiful at the same time.  A Granny Square is hard working, frugal, sturdy and beautiful just like Grandmothers.  I really think the name fits.