Saturday, January 30, 2021

Replacing the elastic waistband in pants

Supplies                                    Quantity

Seam ripper                                                      1

Thread                                                               1

Elastic                                                               1


Directions

1. Seam rip the old elastic out of the pants. Be sure to remove all the seams the pants are stitched down with

Note: If your elastic waistband is rippling like a ruffle then you have stretched it out beyond being able to springs back. You might have to replace it.

2. Cut the new elastic that is to go into pants. 


Note: Be use to not use the worn out/stretched out elastic as a gauge because if you do it wont fit properly. The new elastic should be slightly smaller than the waist it is going to worn on. The elastic needs to stretch a little to hug the body without being too tight which can leave marks on the skin and be uncomfortable to wear. I pin the elastic together around my sons waist and had him wear it walking around to see how it felt then adjusted it till it held AND was comfortable. After reaching that balance is when I cut off any extra elastic. 

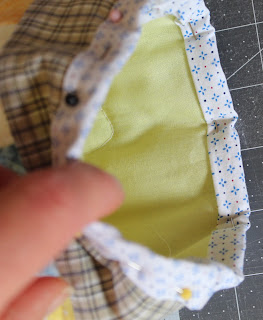
3. Pin the casing down and stitch along the bottom raw edge on the inside of the pants. Be sure to leave an opening large enough to slide the elastic into the casing.


4. Slide the elastic inside the casing. I use a safety pin at the top to push the elastic through the casing. Pin the two edges of the elastic together and zigzag stitch the two ends together.

Note: You want to use a zig-zag stitch on the elastic because it will stretch and not limit or strain the seam where the two parts of the elastic are joined together. 

5. Pin down the opening you slid the elastic through and stitch it closed.


6. Add at least one row in the middle of the elastic to hold the elastic in place. Do this by stretching the elastic as you sew down the middle. Stretch the elastic as far as the fabric is long. You can also add more stitch lines to the bottom of the elastic or the top if you want.


Note: Why do so many pants with elastic have stitching in the middle and along the edges. It seems much easier to make a casing for the elastic, slide the elastic in then close it up and be done with the pants. It would take make five minutes to complete the practice. So why do so many stores that sell pants with the extra stitching on the elastic waist? Why would a store or business would wants to pay a little more money for the extra thread and time it would take to stitch down the  elastic at the waist? My theory is a business would consider it cheaper than all the returns and dissatisfaction of returned pants. When you only slide in the elastic and don't stitch any part of it down after it is washed a few times elastic tends to shift around.  A twisted waist line is uncomfortable to wear. Any top tucked into it would not look right because of how it would lay funny. If the top draped over the waist it again would not lay right. It would be a poor business choice to have customers have so many negative experiences. In contrast if you take the time to stitch down the elastic at least in the middle of the elastic the waist line with stay flat and avoid all of those problems.

Wednesday, December 30, 2020

How to make a patchwork Christmas stocking with FREE printable PDF pattern

If you just need the pattern here is the link. 

Stocking Pattern


Supplies                                                                                                   Quantity

sheets of printer paper                                                                                                          - 4

2 1/2" x 2 1/2" squares(6.5cm x 6.5 cm) scrap fabric                                                          - 88

23" x 13" lining fabric                                                                                                            - 2

23" x 13" batting                                                                                                                    - 2

2" x 8" top band of stocking                                                                                                   - 2

2" x 8" binding and loop                                                                                                        - 3

3 1/2" x 5" heal                                                                                                                     - 2

5 1/2" x 4 1/2" toe                                                                                                                 - 2

Spool of thread                                                                                                                      - 1

Sewing pins

Scissors or rotor cutter

Iron

Directions

Step 1. Print out pattern. Glue together the pattern then cut it out.


Step 2. Cut out fabric.

 
For quilt top layout squares in the arrangement that is visually pleasing to you.
 Then stitch it together row by row and line by line using the same process for a basic quilt top. It should look like something like this:
 
Step 3. Pin right sides of the stocking and the top band together.
  

Step 4. Stack all three layers together and sew together the sandwich. You can sew just along the edge or you can quilt it together for extra texture.


Step 5. Fold edges of heals and toes and pin down then sew down the edges.


Step 6 . Iron loop along fold lines and press lines. 


Pin along edge of loop then sew along both edges of loop to reinforce edges of loop.


Step 7. Place the the right sides of the stocking together. Place the loop inside the right side of the stoking so that the raw edges of the loop line up with the raw edges of the stocking. Pin this all together and sew along edge the flip out.

Step 8. Take stocking binding and place right sides together. Pin along short edge of binding and sew together on only one side.


Iron seam flat then press in folds like you did with the loop.


Place binding around the top edge of the stocking and pin in place then sew along the edge to finish the stocking.


Sunday, November 22, 2020

#Give Thanks

 #Give Thanks

There is so much negativity in the world right now, it can feel like being in quicksand sometimes. I am grateful for the invitation to express gratitude for the things that are going right in my own world. Please feel free to click the link above to see the invitation I am accepting and sharing.

Day 1. More time with my Husband.

In October of 2014 my husband was cycling home from work and was hit by a SUV. He was in a medically induced comma for almost a week and the doctors had a hard time waking him up. He spent another three weeks in in-patient rehab. He had a TBI, a shattered femur, a compound fracture in his arm, double vision and couldn't remember why he was in the hospital for more than five minutes.He had many other injuries and side effects from the accident. I was and am grateful that he could remember who I am and who our children are, even if he got their ages wrong after the accident. He had to relearn how to do so many things. He still has bad days occasionally where he doesn't remember things if he is very tired. He had to learn to write things down to remember them, an executive functioning tool he never had to use before the accident. I still need to drive for him occasionally if his brain won´t let him focus or if it is late at night because he permanently lost some of his periphery vision. I am grateful for the gift I have been given of more time with the man I love. He is still a loving man who is kind, a hard worker, an involved father who loves telling dad jokes. I am grateful he was able to relearn how to walk and seeing him remember things almost like he used to at times. I am grateful that I get more time to work on making him laugh, I am terrible at making jokes. I am aware on a personal level that we never know when we can loose the ones we love and more time with my husband is a gift from God I am thankful for.

Day 2. Children who love others.

We have four children and all of them are different from each other. There are some interests that overlap but their personalities are different and distinct. It can be quit challenging to find the time to support each child's diverse interests in a way that each feels our love for them. As a mother I have days occasionally when I am just tired; physically, emotionally and drained spiritually. On those days, I just want to sit down, take a nap, and stop being responsible for a little bit. On days like that how tired I am must show on my face because my only thought at that point is keep going, you can sleep later. My kids will say something like, mom you really look tired. To which I respond with a smile or a smirk, I am always tired, now we need to do ...(fill in the blank). Sometimes on days like this one of them will bring me a flower they pressed in a book for me. Or give me a bear hug and tell me they love me when I don´t think I can handle folding another load of laundry without crying. Another will decide they want to make dinner so I can sit down and rest. And yet at other times one of them will pull out their violin and play something because they know I love hearing them play. I am grateful for children who notice when I need to feel loved and supported and they find something they can do to try to make things better for me. I have also seen them do this with their siblings even though at times I know they drive each other crazy. I am grateful for children who are capable of loving others and who have the courage to do something about it.


Day 3. A God who listens and loves

I remember hearing as I grew up that God in Old Testament times was an angry person. I also remember my shock the first time  read through the Old Testament and I noticed how disobedient the ancient Israelites were. God would try to get them to do the right thing and try again and again until eventually He would need to start to implement consequences to help them learn to stop doing whatever they were doing wrong. I saw a patient parent who was trying to help rebellious kids learn to stop making the same mistake. As stupid as I felt they were and as often as I have wondered at how slow they were to learn, I have benefited from that same patience when I have made stupid choices of my own. I am grateful for a Heavenly parent who loves me and listens to me when I talk with Him in prayer. I love the relationship of love.

Day 4. Ancestors

One of my interests is learning about my ancestors. One of the reasons this started when I was young is I was often asked ¨What are you?¨ This started at such a young age I didn't understand what I was being asked at first. I thought other kids or adults couldn't tell I was a girl. I was a Tomboy you see so I thought it was my clothes or because I was often playing sports of some variety or building forts. Later as a teenager I realized I was being asked what my ethnicity was or who my ancestors are. So by the time I was about 11 or 12 years old I started asking my parents and they didn't know much. So I started writing letters to aunts, uncles and grandparents. These aunts and uncles and grandparents had some answers but a lot of it still didn't add up. I kept digging and learning about how to research family trees. Finally in my 30ś some of my family members and I took DNA tests. The results lead me down completely different research avenues. I very quickly found a paper trail that matched the DNA. Now I have answers that make so much more sense than what I was given as a kid. I am very blessed to have ancestors from all over the world. It is this diversity that causes people I meet to not be able to neatly put me into an ethnicity category. I am grateful that my ancestors, for generations, broke with social norms and married people who were different than them. It is a great legacy of diversity that they have passed down to me and our children. I have been enjoying learning about them and from them. I have a chance to learn from so many cultures and take the good from my ancestors that they offer.

Day 5. Art

I am grateful for the ability to create things of beauty. To learn from others who create beauty. To have the chance to explore the balance between creating something functional that also beautifies my world. I also enjoy the opportunity to create things that have no other function but to be beautiful and lift the spirits of others. There are so many things that are hard and ugly in this world that bring it down. I love that art has the potential to lift others out of that darkness. I love that art can give artists a way to express what is inside them and a viewer can look at that art and be touched by what that artist is saying.


Day 6. Health

I have been sick the last few days and I am feeling grateful that what I am feeling is a mild cold. So many have lost their lives to Covid19.  I have been watching on the news as so many have died. Right now in our country we have lost a third of the lives that we did in the Civil War to Covid19. In the world more people have died than in our Civil War. So many lives lost. I keep hoping it will stop and yet all I see is it getting worse. So I am grateful that all I am dealing with is a cold.

Day 7. Gardening

I love planting seeds and watching them grow. I enjoy the anticipation of waiting and watching for the seeds to sprout every day. I enjoy watching the plant grow and change as it matures. I like the satisfaction of adding in supports and clearing weeds so that the plant can grow well. To be clear I do get annoyed by weeds but I enjoy ripping them out by the roots so that the plant I want to grow is healthier. With so much of what I need to get done as a mother and wife that requires I stay inside to get things done I enjoy the time outside in the sun and fresh air. Time spent gardening feels like a luxury in my life.

Monday, October 19, 2020

Patching fabric: Holes in the knees


I have patched a number of holes in the knee over the years. I have noticed a few things about the patches that work best and are the most durable.

You need to make sure the base fabric you use for your patch is the same material as the item you are patching. You can add other fabric types and embellishments on top of the base fabric but the base fabric needs to be the same. Why do they need to be the same? So they wear out at the same rate and so they stretch in the same way.  When I put fabrics together that were not the same together the result was always a new rip.

I also noticed that I need to make my patches much larger than most store patches or tutorials I have followed online. Why would I say this? When a hole is created in fabric it is often from extra wear on a particular spot repeatedly. In the center you have the weakest point of your hole then as you expand outwards from the hole you eventually get to fabric that is not weakened from wear.


When you patch fabric you need to go out until you reach a point of strength again in the fabric. If you need an example of this look at a pair of pants that have a hole in the knee. Put your hands on the pants starting at the hole and move you hand slowly away from the hole. You should feel a gradation in the fabric strength. The fabric will be at it’s thickest when you have reached uncompromised material again. You could also look at the color of the fabric. Worn jeans that have holes in the knees are lighter in color as they get closer to the hole. You can reverse it and find the original color of the pants.


I have also noticed that I need to create a quilted affect with the patch.  When I just sewed along the outside edges of the patch it would wear out at this new seam.  Instead when I would sew down the patch not only along the edge but join the fabric in multiple locations across the patch and beyond the edges of the patch it distributed the stress of the joined fabric. I saw this on a pair of pants I patched for our youngest son. He likes Spiderman and he likes to climb things a lot, so we call him Spiderman Jr. When he got a hole in his knee I asked what kind of patch he wanted on the pants. I was not surprised when he answered, “Spiderman”. I made a Spiderman patch I cut it out from some left over scrap material I had. What I did different with this patch is I added a web for Spiderman to be hanging on around the patch. That patch was so strong because I had created so many anchor points with that web that he actually outgrew those pants rather than broke the patch or created a new hole in his pants.

I hope this helps you spend less time re-patching fabric multiple times as I did in the beginning.


Example:

Feel fabric of the knee from the hole out till I get to strong denim again. This also matches where the pants are no longer faded.


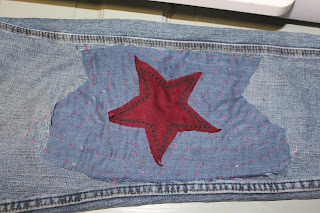
Take scrap denim and cut to the size need to sew strength for equal strength. Cut denim to the appropriate size.


Cut out any extra embellishments that are desired and sew these on top the of the denim scrap patch.


 Pin patch to denim jeans and sew down the quilted pattern. In this case and slowly expanding star shape through all the layers of the fabric.