Wednesday, March 31, 2021

How to mend sweater holes

Matching thread  

Before


Step 1


Seam rip off the collar. I was gentle and took my time taking off the collar. I didn't want to cause any additional damage to the sweater.

Step 2


Gently pull the thread that the collar was woven from apart. Side note: This was an interesting experience because I have told my children so many times never to pull loose threads because it will make holes or cause damage to fabric. Always cut it carefully. Now I was pulling on threads intentionally to pull the collar apart.

Step 3


Take a needle and some of the thread that was pulled apart and thread your needle. 

Step 4


Place your hand inside of the item you need to mend in the area where the hole is located. Notice outside your hole you will see threads that look like they are on top and thread below those same threads or staggered beneath the threads on top. You will be weaving over and under these threads to create a new patch of fabric where the hole is. For me I measure how big the hole is and start about that same distance away from the hole weaving over and then under, over and then under repeating that pattern until I get to the edge of the hole. Now I will leave a straight line of thread across the hole. On the other side of the hole I will start weaving over then under, over then under until I have gone the same distance away from the hole as I did on the other side.


Turn around and go back the way you came on a parallel line next to the one you just created. Make sure to go under then over. You want to do the opposite of whatever the line you just did for your weaving. For Example: if you just did over then under then do under then over on the way back. Repeat this until you filled in the hole horizontally. At the end you should have a bunch of parallel threads across your hole and along both edges of the hole. It should be a rectangle  that is larger than your  hole.


Step 5


Now going perpendicular to the weaving you just put in your sweater you want to weave over and then under and alternating on the next line under then over in parallel lines again. Except this time your will get to weave over and under your threads that you ran across your hole. Keep repeating this pattern back and forth again until you have closed up the hole. You should now have perpendicular rectangle larger than the original hole you had.

Here is what mine looked like closed.

After


Can you tell that these have been mended, yes if you are up really close. But at the distance that most people stand at before the pandemic it wouldn't matter.

What if you don't have perfectly matching thread you can use from the same clothing item? I had a jacket that had a hole at the neck that had come apart. Side note: I think the tag is what made it wear out there.

Here is an alternative solution when you don't have identical thread to use.

Contrasting thread/yarn

Before


Repeat steps 1-5 as shown above.


Step 6


Outline a shape that you like with a contrasting color, I chose a star. I also decided to use a yarn that was very close to the mint green the jacket was trimmed with along the edge. Then using the same weaving technique I filled in the shape till I liked how it looked. Side note: Not all mending has to disappear. It can add interest to show that clothing has been mending depending on how you do it. It could just be a mended item or you can make it look more original by embracing the chance that mending brings. It can be fun.

After


Back Story:

Shopping at Thrift stores can be really fun. There is so much variety in the styles of clothes and you can often get nicer quality clothing for far less than buying it new. When I take my teenage daughters we wander around looking at all the clothes, hats, scarves etc. When we have found everything we think we might like we start to narrow things down. We look at how long the clothes might last, are there any holes in them, or are too big or have a stain on them. With thrift store shopping these kinds of problems just arise and we expect them when we look at clothes.

 For our family these kinds of things are not necessarily deal breakers because I can mend and sew. If the clothes have a hole my next question is, Can it be mended closed or patched with out it ripping back open. If the answer is yes, then the item is still under consideration. If the item is too big can I take it in? Some fabrics do not handle seam ripping well and would not handle well what it would take to make the item fit. With other fabrics it's no problem to take things in a little bit or a lot. If its a stain, is this a stain that will come out? If the clothes are a little too bit and I take the item in so that the stain is gone? It is a whole process and is very tiring.

So when I was shopping for "new" clothes with our teenage daughters we found a cashmere sweater one of our daughters loved the color and texture of but there was a collar she didn't like and there were some holes in the front and back. She asked me "Could you take the collar off?" I looked at it and said "Sure." I didn't even mention the holes I noticed because I knew I could use the collar thread to mend the holes in it. I was able to take the collar off and mend the holes in a about an hour. Well worth the 5 dollars we paid for the cashmere sweater she wears at least once a week.

Tuesday, February 23, 2021

Hearts Coloring page

 Hearts Coloring page


I have been doodling and drawing more often over the last year and it has been really good for me to do what I love more regularly. I thought I would share another printable coloring page because giving love to ourselves and others shouldn't be limited to just Valentines Day.

Saturday, January 30, 2021

Replacing the elastic waistband in pants

Supplies                                    Quantity

Seam ripper                                                      1

Thread                                                               1

Elastic                                                               1


Directions

1. Seam rip the old elastic out of the pants. Be sure to remove all the seams the pants are stitched down with

Note: If your elastic waistband is rippling like a ruffle then you have stretched it out beyond being able to springs back. You might have to replace it.

2. Cut the new elastic that is to go into pants. 


Note: Be use to not use the worn out/stretched out elastic as a gauge because if you do it wont fit properly. The new elastic should be slightly smaller than the waist it is going to worn on. The elastic needs to stretch a little to hug the body without being too tight which can leave marks on the skin and be uncomfortable to wear. I pin the elastic together around my sons waist and had him wear it walking around to see how it felt then adjusted it till it held AND was comfortable. After reaching that balance is when I cut off any extra elastic. 

3. Pin the casing down and stitch along the bottom raw edge on the inside of the pants. Be sure to leave an opening large enough to slide the elastic into the casing.


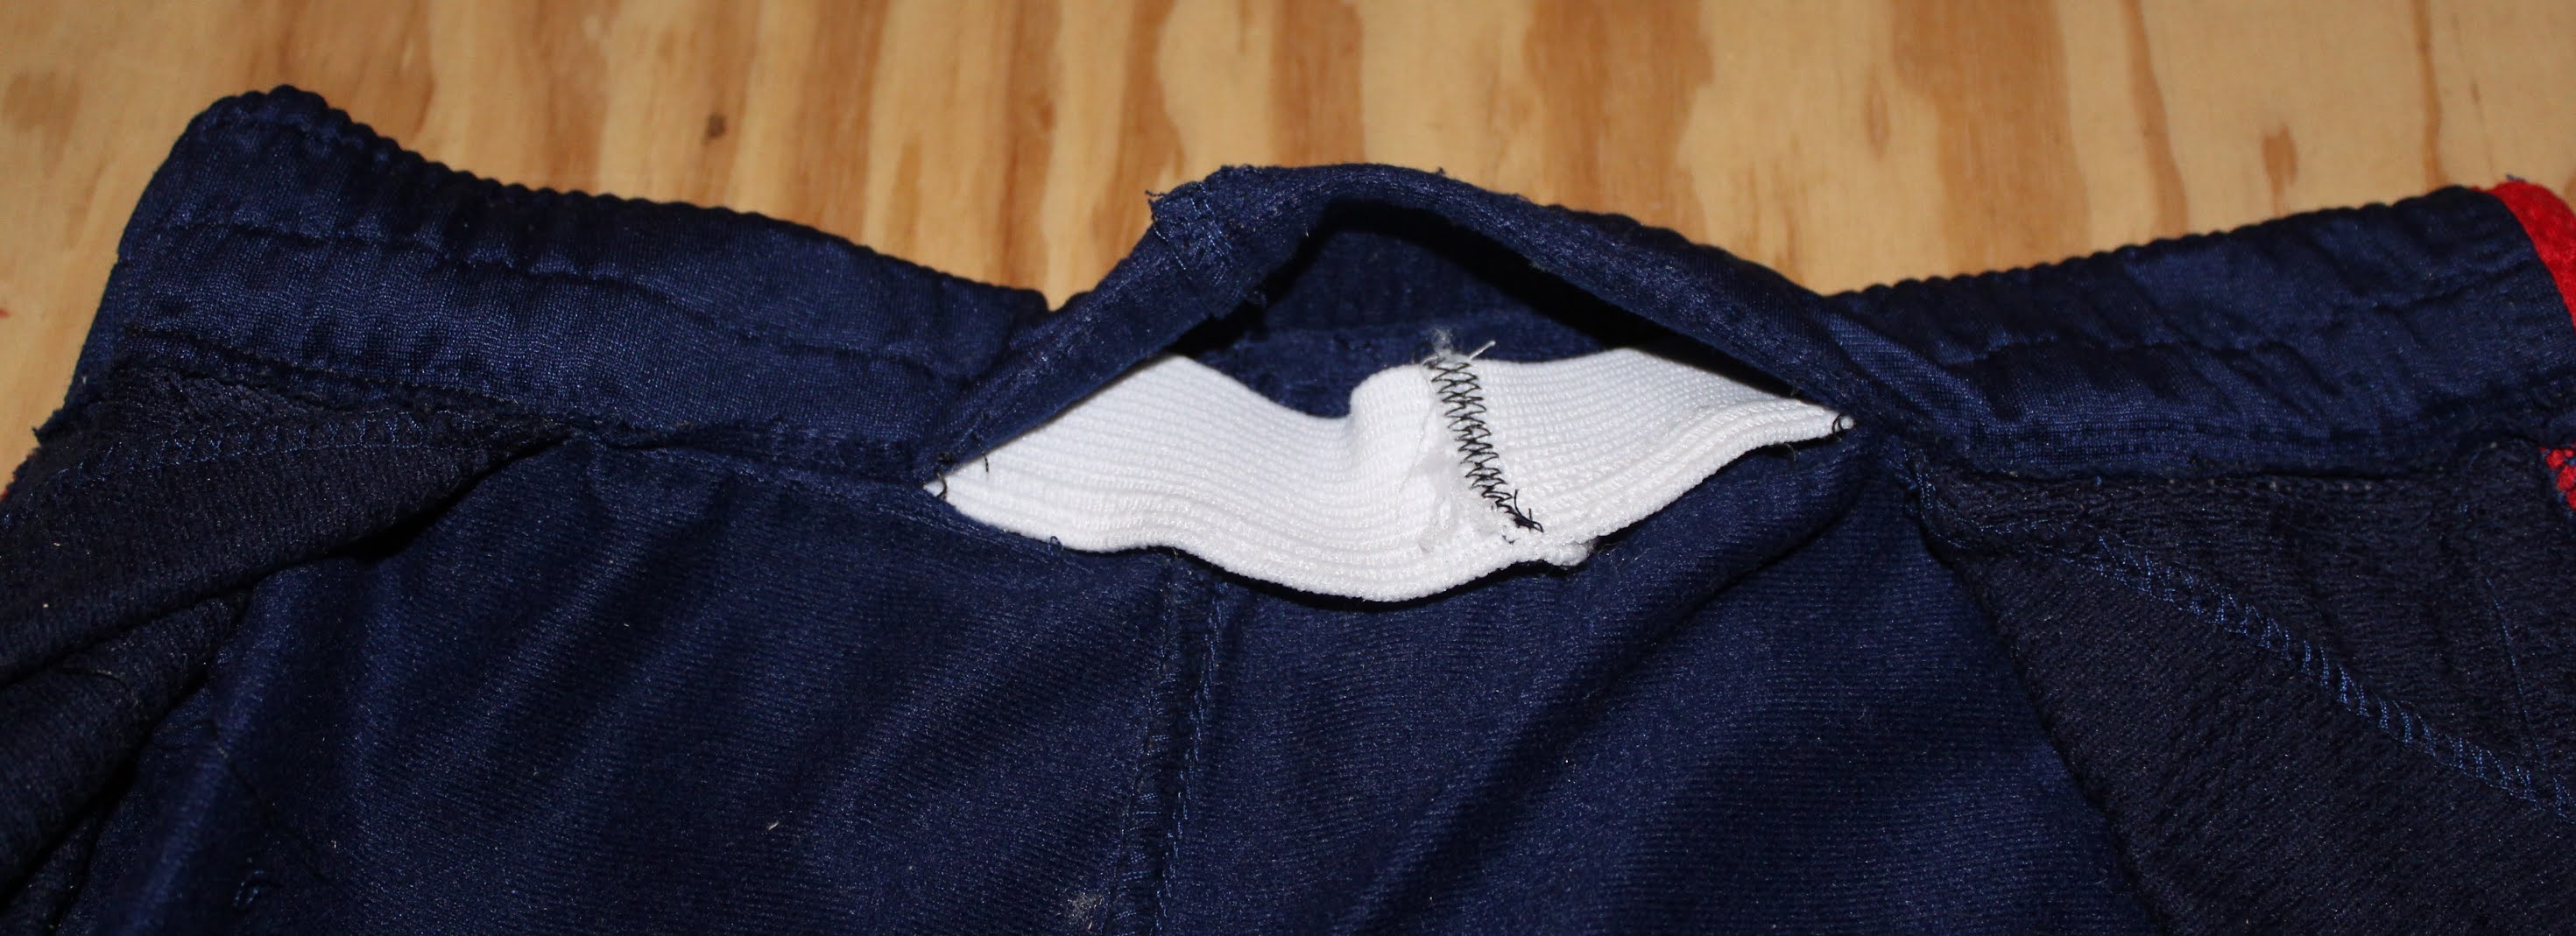
4. Slide the elastic inside the casing. I use a safety pin at the top to push the elastic through the casing. Pin the two edges of the elastic together and zigzag stitch the two ends together.

Note: You want to use a zig-zag stitch on the elastic because it will stretch and not limit or strain the seam where the two parts of the elastic are joined together. 

5. Pin down the opening you slid the elastic through and stitch it closed.


6. Add at least one row in the middle of the elastic to hold the elastic in place. Do this by stretching the elastic as you sew down the middle. Stretch the elastic as far as the fabric is long. You can also add more stitch lines to the bottom of the elastic or the top if you want.


Note: Why do so many pants with elastic have stitching in the middle and along the edges. It seems much easier to make a casing for the elastic, slide the elastic in then close it up and be done with the pants. It would take make five minutes to complete the practice. So why do so many stores that sell pants with the extra stitching on the elastic waist? Why would a store or business would wants to pay a little more money for the extra thread and time it would take to stitch down the  elastic at the waist? My theory is a business would consider it cheaper than all the returns and dissatisfaction of returned pants. When you only slide in the elastic and don't stitch any part of it down after it is washed a few times elastic tends to shift around.  A twisted waist line is uncomfortable to wear. Any top tucked into it would not look right because of how it would lay funny. If the top draped over the waist it again would not lay right. It would be a poor business choice to have customers have so many negative experiences. In contrast if you take the time to stitch down the elastic at least in the middle of the elastic the waist line with stay flat and avoid all of those problems.

Wednesday, December 30, 2020

How to make a patchwork Christmas stocking with FREE printable PDF pattern

If you just need the pattern here is the link. 

Stocking Pattern


Supplies                                                                                                   Quantity

sheets of printer paper                                                                                                          - 4

2 1/2" x 2 1/2" squares(6.5cm x 6.5 cm) scrap fabric                                                          - 88

23" x 13" lining fabric                                                                                                            - 2

23" x 13" batting                                                                                                                    - 2

2" x 8" top band of stocking                                                                                                   - 2

2" x 8" binding and loop                                                                                                        - 3

3 1/2" x 5" heal                                                                                                                     - 2

5 1/2" x 4 1/2" toe                                                                                                                 - 2

Spool of thread                                                                                                                      - 1

Sewing pins

Scissors or rotor cutter

Iron

Directions

Step 1. Print out pattern. Glue together the pattern then cut it out.


Step 2. Cut out fabric.

 
For quilt top layout squares in the arrangement that is visually pleasing to you.
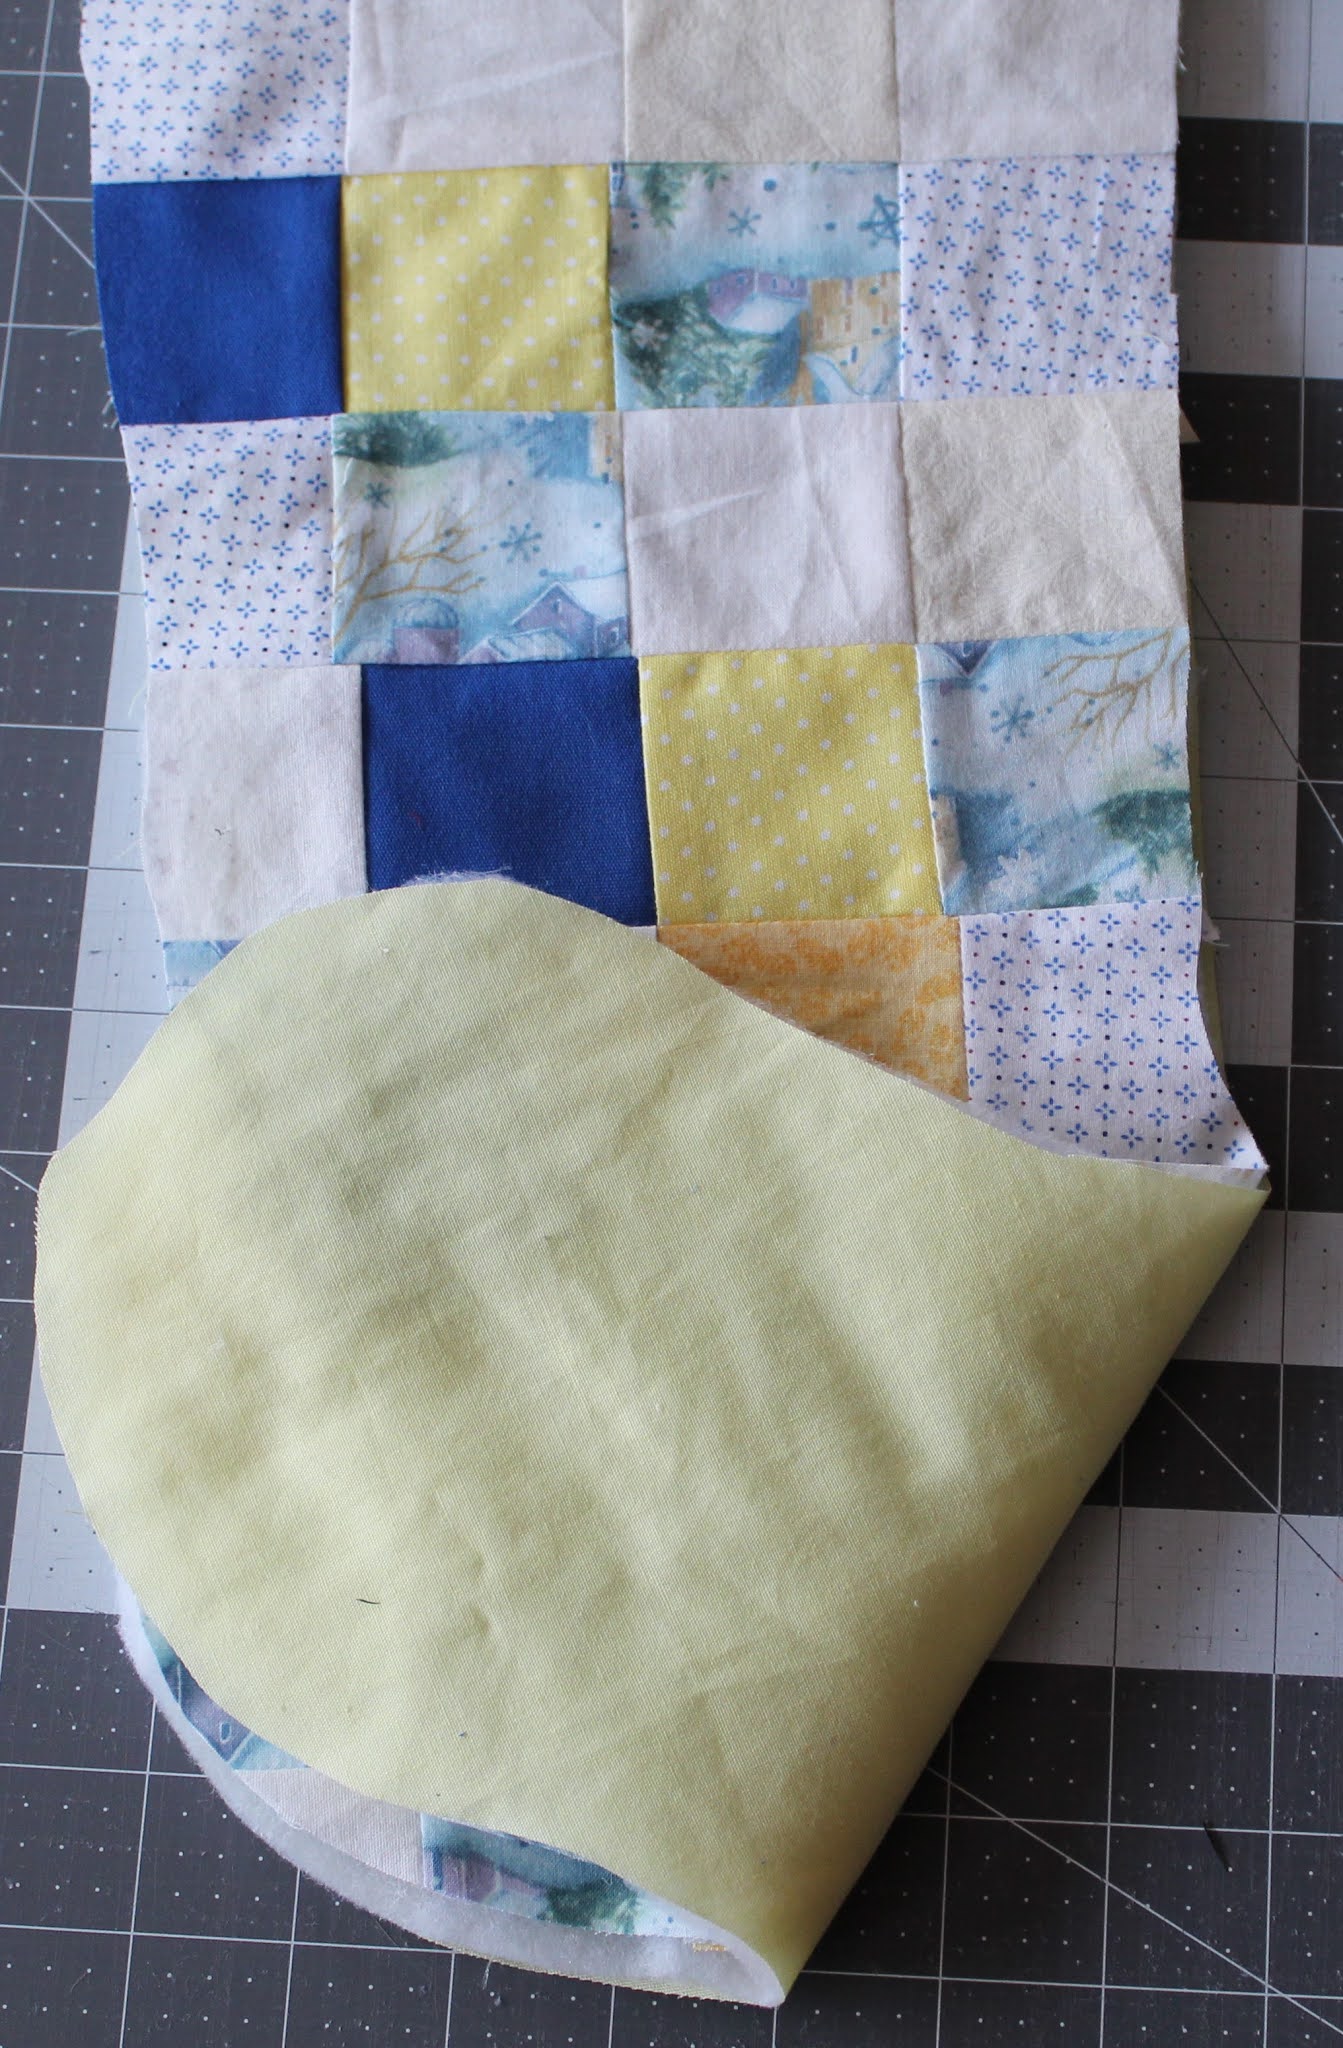
 Then stitch it together row by row and line by line using the same process for a basic quilt top. It should look like something like this:
 
Step 3. Pin right sides of the stocking and the top band together.
  

Step 4. Stack all three layers together and sew together the sandwich. You can sew just along the edge or you can quilt it together for extra texture.


Step 5. Fold edges of heals and toes and pin down then sew down the edges.


Step 6 . Iron loop along fold lines and press lines. 


Pin along edge of loop then sew along both edges of loop to reinforce edges of loop.


Step 7. Place the the right sides of the stocking together. Place the loop inside the right side of the stoking so that the raw edges of the loop line up with the raw edges of the stocking. Pin this all together and sew along edge the flip out.

Step 8. Take stocking binding and place right sides together. Pin along short edge of binding and sew together on only one side.


Iron seam flat then press in folds like you did with the loop.


Place binding around the top edge of the stocking and pin in place then sew along the edge to finish the stocking.